# Home

Welcome to Vote Manager's docs. You can consider this to be like a manual for if you get confused or just need some help

### Getting Started

Please ensure that Vote Manager is in the server that you want to use it in. If not, you can invite it [here](https://votemanager.xyz/invite).

### Web Dashboard

You can access the web dashboard at [dashboard.votemanager.xyz](https://dashboard.votemanager.xyz). It can be used to configure trackers more easily via a web UI


# Variables

Variables allow you to easily add information about the voter, bot, server and more into your custom vote embeds

## Variable Formatting

Variables require **lowercase** letters and must be surrounded with `{}`.

#### Incorrect Variable Formatting

{% code title="Missing {}" %}

```
tag
```

{% endcode %}

{% code title="Contains uppercase letters" %}

```
{Tag}
```

{% endcode %}

{% code title="Contains a space" %}

```
{total votes}
```

{% endcode %}

#### Correct Variable Formatting

```
{tag}
{total_votes}
{tag.tag}
```

***

## TagScript V2

TagScript V2 is our current system for variables & dynamic content in messages. TagScript V1 only supported text variables and a few image variables, with inconsistent naming and formats.

All V2 tags has a Top Level Tag, followed by a period (`.`) and then a property. This makes it much easier to see what a tag is for and gives access to many more tags.

In addition to these fixes and improvements, TagScript V2 adds more types of tag: **Colour**, **Link** & **Date** tags. Some can be used with the existing setup commands & embed customisation in Discord, and some, such as link tags, will only be useful when customising the extra fields available in the [Dashboard](https://dashboard.votemanager.xyz).

### Top Level Tags

Some Top Level Tags have replaced values, usually mentions, if no additional property is specified

Top Level Tags are tags which specify where the main information comes from. Without a property, it will not work properly.

You can click on the tag to get more information.

<table><thead><tr><th width="144">Tag</th><th>Description</th><th>Value</th></tr></thead><tbody><tr><td><a href="#voter-properties">voter</a></td><td>Contains information about the user who voted</td><td><code>&#x3C;@760170825629958184></code></td></tr><tr><td><a href="#guild-properties">guild</a></td><td>Contains information about the guild the tracker is setup in</td><td></td></tr><tr><td><a href="#app-properties">app</a></td><td>Contains information about the bot that was voted for</td><td><code>&#x3C;@959699003010871307></code></td></tr><tr><td><a href="#platform-properties">platform</a></td><td>Contains information about the platform that the vote was on</td><td></td></tr><tr><td><a href="#rewards-properties">rewards</a></td><td>Contains information about the rewards given</td><td></td></tr><tr><td><a href="#miki-properties">miki</a></td><td>Contains information about the Miki EXP data that was given.</td><td></td></tr></tbody></table>

{% hint style="warning" %}
If a server was voted for, then any `app` tags will be replaced with nothing, or may not the replaced at all. The `guild` tag will always be replaced with the data of the server the vote message is to be sent in, even if the target was a bot
{% endhint %}

### `voter` Properties

{% hint style="info" %}
In order to make it work properly, you use `{voter.id}` as example.
{% endhint %}

<table data-full-width="true"><thead><tr><th width="191">Tag</th><th>Description</th><th>Valid For<select multiple><option value="9706cb0e435d4d1cadb32d26e9804bea" label="Image" color="blue"></option><option value="05360f9338284067940a45938172fa61" label="Text" color="blue"></option><option value="c6823b4adf8a4b0d8cb3a6a75b93057d" label="Colour" color="blue"></option><option value="21a57cdae11b43089d1fef31f0a19852" label="Date" color="blue"></option><option value="0f9f981453cf4eb386820cba3377dc49" label="Link" color="blue"></option></select></th></tr></thead><tbody><tr><td><code>id</code></td><td>ID of the voter</td><td><span data-option="05360f9338284067940a45938172fa61">Text</span></td></tr><tr><td><code>username</code></td><td>Username of the voter</td><td><span data-option="05360f9338284067940a45938172fa61">Text</span></td></tr><tr><td><code>global_name</code></td><td>Voter's global display name, falls back to <code>username</code> if not set</td><td><span data-option="05360f9338284067940a45938172fa61">Text</span></td></tr><tr><td><code>display_name</code></td><td>Voter's nickname, or <code>global_name</code> if not set</td><td><span data-option="05360f9338284067940a45938172fa61">Text</span></td></tr><tr><td><code>votes</code></td><td>Voter's total votes</td><td><span data-option="05360f9338284067940a45938172fa61">Text</span></td></tr><tr><td><code>buckets:&#x3C;id></code></td><td>Number of votes in the bucket with the ID <code>&#x3C;id></code>, for example <code>voter.buckets:monthly</code> would be the number of votes in the defaut Monthly bucket</td><td><span data-option="05360f9338284067940a45938172fa61">Text</span></td></tr><tr><td><code>created_at</code></td><td>Date voter's account was created on</td><td><span data-option="05360f9338284067940a45938172fa61">Text, </span><span data-option="21a57cdae11b43089d1fef31f0a19852">Date</span></td></tr><tr><td><code>joined_at</code></td><td>Date the voter joined the server</td><td><span data-option="05360f9338284067940a45938172fa61">Text, </span><span data-option="21a57cdae11b43089d1fef31f0a19852">Date</span></td></tr><tr><td><code>avatar_url</code></td><td>Voter's avatar</td><td><span data-option="9706cb0e435d4d1cadb32d26e9804bea">Image, </span><span data-option="0f9f981453cf4eb386820cba3377dc49">Link</span></td></tr><tr><td><code>banner_url</code></td><td>Voter's banner</td><td><span data-option="9706cb0e435d4d1cadb32d26e9804bea">Image, </span><span data-option="0f9f981453cf4eb386820cba3377dc49">Link</span></td></tr><tr><td><code>accent_color</code></td><td>Voter's profile accent colour. Will fallback to default embed if not set</td><td><span data-option="c6823b4adf8a4b0d8cb3a6a75b93057d">Colour</span></td></tr><tr><td><code>banner_color</code></td><td>Voter's profile banner colour. Will fallback to default embed if not set</td><td><span data-option="c6823b4adf8a4b0d8cb3a6a75b93057d">Colour</span></td></tr></tbody></table>

### `guild` Properties

{% hint style="info" %}
In order to make it work properly, you use `{guild.id}` as example.
{% endhint %}

<table data-full-width="true"><thead><tr><th width="194">Tag</th><th>Description</th><th>Valid For<select multiple><option value="4ef4de51d31d40d09caecd3c561f3d66" label="Image" color="blue"></option><option value="9fa6726afaf74dd880f80f22a55509d6" label="Text" color="blue"></option><option value="f66acade483644fb8e9a02c1b28ac887" label="Colour" color="blue"></option><option value="b27cb0ebbdd149fc915a196434647928" label="Date" color="blue"></option><option value="f3534bd4343b46e4938060ae24c111da" label="Link" color="blue"></option></select></th></tr></thead><tbody><tr><td><code>id</code></td><td>ID of the server</td><td><span data-option="9fa6726afaf74dd880f80f22a55509d6">Text</span></td></tr><tr><td><code>name</code></td><td>Name of the server</td><td><span data-option="9fa6726afaf74dd880f80f22a55509d6">Text</span></td></tr><tr><td><code>created_at</code></td><td>Date server was created</td><td><span data-option="9fa6726afaf74dd880f80f22a55509d6">Text, </span><span data-option="b27cb0ebbdd149fc915a196434647928">Date</span></td></tr><tr><td><code>icon_url</code></td><td>Server icon</td><td><span data-option="4ef4de51d31d40d09caecd3c561f3d66">Image, </span><span data-option="f3534bd4343b46e4938060ae24c111da">Link</span></td></tr><tr><td><code>banner_url</code></td><td>Server banner</td><td><span data-option="4ef4de51d31d40d09caecd3c561f3d66">Image, </span><span data-option="f3534bd4343b46e4938060ae24c111da">Link</span></td></tr></tbody></table>

### `app` Properties

{% hint style="info" %}
In order to make it work properly, you use `{app.id}` as example.
{% endhint %}

<table data-full-width="true"><thead><tr><th width="197">Tag</th><th>Description</th><th>Valid For<select multiple><option value="2c2701d0cf3d4478b9a1c595e48fa413" label="Image" color="blue"></option><option value="6b105a42588442b596778fdffed76faa" label="Text" color="blue"></option><option value="f83e1f4c705c48949a4d2f20e4edba18" label="Colour" color="blue"></option><option value="b7fec09629954663a46eeac45682627e" label="Date" color="blue"></option><option value="d7013afe789a446884d8f8a450a47370" label="Link" color="blue"></option></select></th></tr></thead><tbody><tr><td><code>id</code></td><td>ID of the voted bot</td><td><span data-option="6b105a42588442b596778fdffed76faa">Text</span></td></tr><tr><td><code>username</code></td><td>Name of the voted bot</td><td><span data-option="6b105a42588442b596778fdffed76faa">Text</span></td></tr><tr><td><code>created_at</code></td><td>Date the voted bot was made</td><td><span data-option="6b105a42588442b596778fdffed76faa">Text, </span><span data-option="b7fec09629954663a46eeac45682627e">Date</span></td></tr><tr><td><code>joined_at</code></td><td>Date the voted bot joined the server</td><td><span data-option="6b105a42588442b596778fdffed76faa">Text, </span><span data-option="b7fec09629954663a46eeac45682627e">Date</span></td></tr><tr><td><code>avatar_url</code></td><td>Avatar of the voted bot</td><td><span data-option="2c2701d0cf3d4478b9a1c595e48fa413">Image, </span><span data-option="d7013afe789a446884d8f8a450a47370">Link</span></td></tr></tbody></table>

### `platform` Properties

{% hint style="info" %}
In order to make it work properly, you use `{platform.name}` as example.
{% endhint %}

<table data-full-width="true"><thead><tr><th width="202">Tag</th><th>Description</th><th>Valid For<select multiple><option value="23f8a3fbeefa4b0c98dcbfe90dab9341" label="Image" color="blue"></option><option value="9f3ee708c4954e3db63b5860055c3f0f" label="Text" color="blue"></option><option value="775955a3caf64bb4995aad2d830e795b" label="Colour" color="blue"></option><option value="01c08ead21f44c7a805ffdb85d907775" label="Date" color="blue"></option><option value="db019b5ebd864b24ab03e16a60c1e975" label="Link" color="blue"></option></select></th></tr></thead><tbody><tr><td><code>name</code></td><td>Name of the platform voted on</td><td><span data-option="9f3ee708c4954e3db63b5860055c3f0f">Text</span></td></tr><tr><td><code>next_vote.hours</code></td><td>Relative time until the user can vote (e.g. <strong>in 6 hours</strong>) using Discord's <a href="https://www.unixtimestamp.com/">Unix Timestamp</a></td><td><span data-option="9f3ee708c4954e3db63b5860055c3f0f">Text</span></td></tr><tr><td><code>next_vote</code></td><td>Time when the user is next able to vote</td><td><span data-option="9f3ee708c4954e3db63b5860055c3f0f">Text, </span><span data-option="01c08ead21f44c7a805ffdb85d907775">Date</span></td></tr><tr><td><code>url</code></td><td>Link to the platform</td><td><span data-option="9f3ee708c4954e3db63b5860055c3f0f">Text, </span><span data-option="db019b5ebd864b24ab03e16a60c1e975">Link</span></td></tr><tr><td><code>view_url</code></td><td>Link to the bot/servers page on the platform</td><td><span data-option="9f3ee708c4954e3db63b5860055c3f0f">Text, </span><span data-option="db019b5ebd864b24ab03e16a60c1e975">Link</span></td></tr><tr><td><code>vote_url</code></td><td>Link to vote on the platform</td><td><span data-option="9f3ee708c4954e3db63b5860055c3f0f">Text, </span><span data-option="db019b5ebd864b24ab03e16a60c1e975">Link</span></td></tr><tr><td><code>icon_url</code></td><td>Platform's icon/logo</td><td><span data-option="23f8a3fbeefa4b0c98dcbfe90dab9341">Image, </span><span data-option="db019b5ebd864b24ab03e16a60c1e975">Link</span></td></tr></tbody></table>

{% hint style="warning" %}
The `platform.next_vote`, and `platform.next_vote.hours` tags are only supported in message content, embed fields, descriptions & timestamps due to a limitation of Discord's formatting. Using these tags in other fields will cause unexpected formatting
{% endhint %}

### `rewards` Properties

{% hint style="info" %}
In order to make it work properly, you use `{rewards.role}` as example.
{% endhint %}

<table data-full-width="true"><thead><tr><th width="207">Tag</th><th>Description</th><th>Valid For<select multiple><option value="10c03e80e2fd40dd8f0994356bf57694" label="Image" color="blue"></option><option value="a8d8f25826254ca08a6596be3afe0126" label="Text" color="blue"></option><option value="b981992639664c94a1c7651aae056a4b" label="Colour" color="blue"></option><option value="13305ff63e54422383c87be08fbd2265" label="Date" color="blue"></option><option value="54739159e2ec454886953de9a39bbb9a" label="Link" color="blue"></option></select></th></tr></thead><tbody><tr><td><code>role</code></td><td>Mention the primary reward role</td><td><span data-option="a8d8f25826254ca08a6596be3afe0126">Text</span></td></tr><tr><td><code>role.id</code></td><td>ID of the primary reward role</td><td><span data-option="a8d8f25826254ca08a6596be3afe0126">Text</span></td></tr><tr><td><code>role.name</code></td><td>Name of the primary reward role</td><td><span data-option="a8d8f25826254ca08a6596be3afe0126">Text</span></td></tr><tr><td><code>role.duration</code></td><td>Duration primary reward role is kept for</td><td><span data-option="a8d8f25826254ca08a6596be3afe0126">Text</span></td></tr><tr><td><code>role.color</code></td><td>Color of the primary reward role</td><td><span data-option="b981992639664c94a1c7651aae056a4b">Colour</span></td></tr></tbody></table>

### `miki` Properties

{% hint style="info" %}
In order to make it work properly, you use `{miki.bucket}` as example.
{% endhint %}

<table data-full-width="true"><thead><tr><th width="208">Tag</th><th>Description</th><th>Valid For<select multiple><option value="6ddaf5ed31b94d10b6735085f059b91a" label="Image" color="blue"></option><option value="72b7998e1f624133925b78d4c067cd6a" label="Text" color="blue"></option><option value="8f2feeea57a948ed8f4c25000d68a83d" label="Colour" color="blue"></option><option value="5e9dcedf24234961be99c49fa12ea147" label="Date" color="blue"></option><option value="91f1d732fc704ce9a043fde60326fbd9" label="Link" color="blue"></option></select></th></tr></thead><tbody><tr><td><code>bucket</code></td><td>Bucket that given EXP is in</td><td><span data-option="72b7998e1f624133925b78d4c067cd6a">Text</span></td></tr><tr><td><code>exp</code></td><td>Amount of EXP given to voter</td><td><span data-option="72b7998e1f624133925b78d4c067cd6a">Text</span></td></tr><tr><td><code>levelled_up</code></td><td>If the user has levelled up</td><td><span data-option="72b7998e1f624133925b78d4c067cd6a">Text</span></td></tr></tbody></table>

### Additional Tags

{% hint style="warning" %}
These tags do not have a top level tag! You use them as `{date}` as example.
{% endhint %}

<table data-full-width="true"><thead><tr><th width="207">Tag</th><th>Description</th><th>Valid For<select multiple><option value="9e1929b7c03944d7b352dc566d5a238d" label="Image" color="blue"></option><option value="6b96304e2f634b3698a983187ab28eee" label="Text" color="blue"></option><option value="f0c39f1be55e46fb9af86c597e5dfdcb" label="Colour" color="blue"></option><option value="805b9a31e0414bba9cf131690a8f5172" label="Date" color="blue"></option><option value="2b40c9716d084afd8bc2352e05c371a9" label="Link" color="blue"></option></select></th></tr></thead><tbody><tr><td><code>date</code></td><td>Current date</td><td><span data-option="6b96304e2f634b3698a983187ab28eee">Text, </span><span data-option="805b9a31e0414bba9cf131690a8f5172">Date</span></td></tr><tr><td><code>monthly_votes</code></td><td>Voter's votes in the monthly bucket.</td><td><span data-option="6b96304e2f634b3698a983187ab28eee">Text</span></td></tr></tbody></table>

{% hint style="danger" %}
`{monthly_votes}` has been deprecated and may be removed in a future update.\
You should use `{voter.buckets:monthly}` instead.
{% endhint %}

***

## TagScript V1

{% hint style="danger" %}
TagScript V1 is now deprecated and will not work inside of Vote Messages anymore. If you notice tags not getting replaced, make sure to check its a TagScript V2 variable
{% endhint %}

### Text Variables

The following variables are supported in all embed fields except image & field name & values. Please see below for a list of supported variables for images

<table><thead><tr><th width="141">Name</th><th>Description</th><th width="81" data-type="checkbox">Bots</th><th width="92" data-type="checkbox">Servers</th></tr></thead><tbody><tr><td>tag</td><td>Voters username &#x26; tag</td><td>true</td><td>true</td></tr><tr><td>id</td><td>Voters user ID</td><td>true</td><td>true</td></tr><tr><td>mention</td><td>Mentions the voter</td><td>true</td><td>true</td></tr><tr><td>total_votes</td><td>Voters total votes for the bot/server</td><td>true</td><td>true</td></tr><tr><td>monthly_votes</td><td>Voters votes for the bot/server this month</td><td>true</td><td>true</td></tr><tr><td>platform</td><td>Platform the bot/server was voted on</td><td>true</td><td>true</td></tr><tr><td>link</td><td>Link to vote for the bot/servre</td><td>true</td><td>true</td></tr><tr><td>date</td><td>Current date</td><td>true</td><td>true</td></tr><tr><td>role</td><td>Role given to voters</td><td>true</td><td>true</td></tr><tr><td>duration</td><td>Duration vote role is kept for</td><td>true</td><td>true</td></tr><tr><td>guild_name</td><td>Name of the voted or current server</td><td>true</td><td>true</td></tr><tr><td>guild_id</td><td>ID of the voted or current server</td><td>true</td><td>true</td></tr><tr><td>bot_name</td><td>Name of the voted bot</td><td>true</td><td>false</td></tr><tr><td>bot_mention</td><td>Mentions the voted bot</td><td>true</td><td>false</td></tr></tbody></table>

### Image Variable List

The following variables are only supported for the author, footer & main image fields of the vote embed

<table><thead><tr><th width="135">Name</th><th>Description</th><th width="74" data-type="checkbox">Bots</th><th width="100" data-type="checkbox">Servers</th></tr></thead><tbody><tr><td>user_avtar</td><td>Voters icon</td><td>true</td><td>true</td></tr><tr><td>app_icon</td><td>Icon of the voted bot/server</td><td>true</td><td>true</td></tr></tbody></table>


# Troubleshooting

Here are a few problems people run into frequently and some solutions

<details>

<summary>The vote message is not being sent</summary>

Please ensure that the channel you have configured exists and that vote manager has the following permissions in it:

* View Channel
* Send Messages
* Embed Links

</details>

<details>

<summary>The reward role is not being given</summary>

There are 2 common causes for this issue:

1. **Vote Manager does not have permission to give roles**\
   In order to solve this, please ensure that vote manager has a least one role with either the **Manage Roles** or **Administrator** permission
2. **The role Vote Manager is trying to give is above its highest role**\
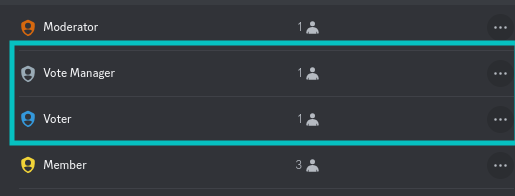
   Bots are only able to give roles that are below their highest role. To solve this, move at least one role (likely the `@Vote Manager` role above the role you are trying to give, as below

<img src="https://1720966575-files.gitbook.io/~/files/v0/b/gitbook-x-prod.appspot.com/o/spaces%2FeFEtDi3YGaE1Ne03okdh%2Fuploads%2Fgit-blob-dcda25116710c8bd38aca43d8102b40d93702d41%2Ftroubleshooting_role_order.png?alt=media" alt="" data-size="original">

</details>

<details>

<summary>The bot cannot respond to commands or send messages</summary>

Vote Manage requires at least one role (usually the `@Vote Manager` role with the following permissions

* View Channels
* Send Messages
* Send Messages in Threads
* Use External Emojis
* Embed Links
* Attach Files
* Add Reactions
* Manage Roles
* Manage Webhooks
* Read Message History

Alternatively, you can grant the **Administrator** permission to any role that Vote Manager has to provide it with all required permissions

</details>


# Creating

Vote Manager supports many bot lists including Top.gg, Discords.com & Discord Bot List. Below, you can find information about how to set up Vote Manager for your Discord Bot

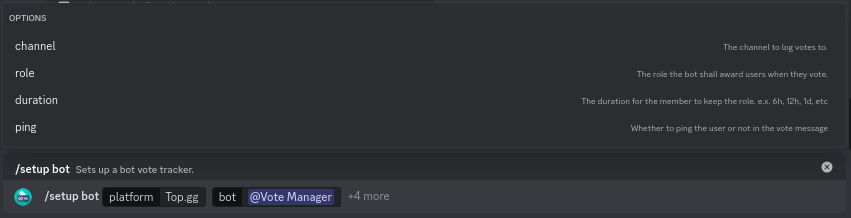
To get started with setup, run the `/setup create bot` command and fill in the options

<figure><img src="https://1720966575-files.gitbook.io/~/files/v0/b/gitbook-x-prod.appspot.com/o/spaces%2FeFEtDi3YGaE1Ne03okdh%2Fuploads%2Fgit-blob-a91e34eab63ed732c4d2cdeba2413d45a4743e40%2Fbot_create_1.png?alt=media" alt=""><figcaption><p>Setup Create command</p></figcaption></figure>

{% tabs %}
{% tab title="Required Options" %}

* `platform` - The platform you want to setup the vote tracker on
* `bot` - The bot you want to setup the vote tracker for
  {% endtab %}

{% tab title="Optional Options" %}

* `role` - Role to be given to users after they vote
* `duration` - How long user should keep the role specified above
* `ping` - Should the voter be pinged in the vote message
* `channel` - The channel to send your vote message in
  {% endtab %}
  {% endtabs %}

<figure><img src="https://1720966575-files.gitbook.io/~/files/v0/b/gitbook-x-prod.appspot.com/o/spaces%2FeFEtDi3YGaE1Ne03okdh%2Fuploads%2Fgit-blob-f17ebff159c0f51fba8955422972fd32e89ffd61%2Fbot_create_2.png?alt=media" alt=""><figcaption><p>Options have been filled out</p></figcaption></figure>

{% hint style="info" %}
You must provide either a role or a channel (or both). A vote message will only be sent if you provide a channel
{% endhint %}

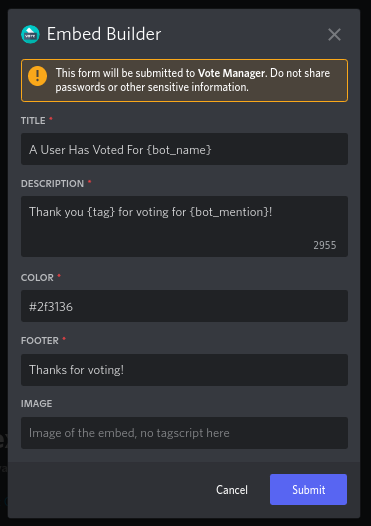
Once you have filled out the options, run the command. Upon doing so, a pop-up will appear allowing you to customise the embed on your vote message. Please see below for details about required & optional fields as well as default values

<figure><img src="https://1720966575-files.gitbook.io/~/files/v0/b/gitbook-x-prod.appspot.com/o/spaces%2FeFEtDi3YGaE1Ne03okdh%2Fuploads%2Fgit-blob-72a61e24e7d74559e963d484aa5c02004fc2c6f1%2FBot%20Create%20%233.png?alt=media" alt=""><figcaption><p>Vote Embed Builder</p></figcaption></figure>

{% hint style="info" %}
You can use variables to have vote information in your vote message. see [here](/variables) for more details
{% endhint %}

{% tabs %}
{% tab title="Required Fields" %}

* **Title** - title of the embed
  * <mark style="color:green;">**✓**</mark> <mark style="color:green;">- Variables are supported</mark>
  * <mark style="color:green;">**✓**</mark> <mark style="color:green;">- Markdown is supported</mark>
* **Color** - color of the left border on the embed
  * <mark style="color:green;">**✓**</mark> <mark style="color:green;">- Variables are supported</mark>
  * <mark style="color:red;">**✗**</mark> <mark style="color:red;">- Markdown is not supported</mark>
  * <mark style="color:green;">**✓**</mark> <mark style="color:green;">- Allowed formats</mark>
    * Hex code (Ex `#0bbbb7`)
    * Integer (Ex `0x0bbbb7`)
    * RGB color values (Ex `11, 187, 183`)
    * Preset (Ex `Red`)
* **Description** - main content of the embed
  * <mark style="color:green;">**✓**</mark> <mark style="color:green;">- Variables are supported</mark>
  * <mark style="color:green;">**✓**</mark> <mark style="color:green;">- Markdown is supported</mark>
* **Footer** - small text at the bottom of the embed
  * <mark style="color:green;">**✓**</mark> <mark style="color:green;">- Variables are supported</mark>
  * <mark style="color:red;">**✗**</mark> <mark style="color:red;">- Markdown is not supported</mark>
    {% endtab %}

{% tab title="Optional Fields" %}

* **Image** - Big image in the embed. Appears below the description
  * <mark style="color:green;">**✓**</mark> <mark style="color:green;">- Variables are supported</mark>
  * <mark style="color:red;">**✗**</mark> <mark style="color:red;">- Markdown is not supported</mark>
  * <mark style="color:green;">**✓**</mark> <mark style="color:green;">- Allowed formats</mark>
    * Any `https`or `http` link to an image file
      {% endtab %}
      {% endtabs %}

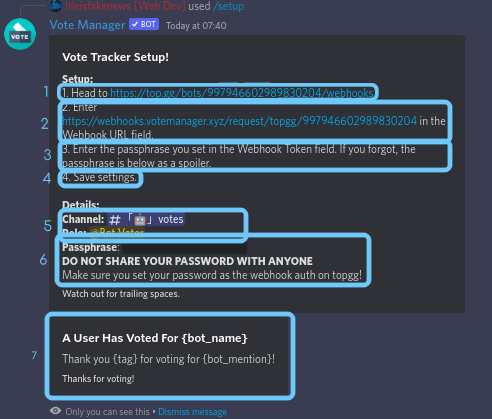
Once you have made your custom embed, press the submit button. This will close the pop-up, and you will be sent a message similar to the following

<figure><img src="https://1720966575-files.gitbook.io/~/files/v0/b/gitbook-x-prod.appspot.com/o/spaces%2FeFEtDi3YGaE1Ne03okdh%2Fuploads%2Fgit-blob-98702a4517af4004dfa3cbca7fa9c606add2ded3%2FBot%20Create%20%234.png?alt=media" alt=""><figcaption><p>Last step in Discord</p></figcaption></figure>

* **1-4**: These are the next steps for your setup. You can find more detail about them by going to the page in our docs for the bot list you are using:
  * [Top.gg](/bots/create/topgg)
  * [DiscordBotList.com](/bots/create/discords)
  * [Discords.com](/bots/create/discords)
  * [Discord List](/bots/create/dlist)
  * [Infinity Bots](/bots/create/ibl)
  * [Botlist.me](/bots/create/botlist)
  * [Void Bots](/bots/create/voidbots)
  * [Discord Place](/bots/create/discord-place)
  * [BHList](/bots/create/bhlist)
  * [Rovel Stars](/bots/create/rovel-stars)
* **5**: Details about your vote tracker including the channel, role & duration
* **6**: This is the authentication password for your tracker. **Do not share this with anyone else!** We also recommend keeping this somewhere safe as you may need it later
* **7**: The second embed is a preview of your vote message

To continue your setup, please go to the URL provided in the above embed (#1). Here you should find a place to input the webhook URL provided in the above embed (#2) and the password (#6). If you can't find it please go to our docs page from the bot list you are using.


# Top.gg

Find a more detailed description about setting up a bot on Top.gg with Vote Manager

{% hint style="info" %}
This continues from the tutorial on the previous page ([here](/bots/create))
{% endhint %}

To continue your setup, please go to the link shown as step one. It should look like this: `https://top.gg/bot/[your-bots-id]/webhooks`

**E.G.** `https://top.gg/bot/959699003010871307/webhooks`

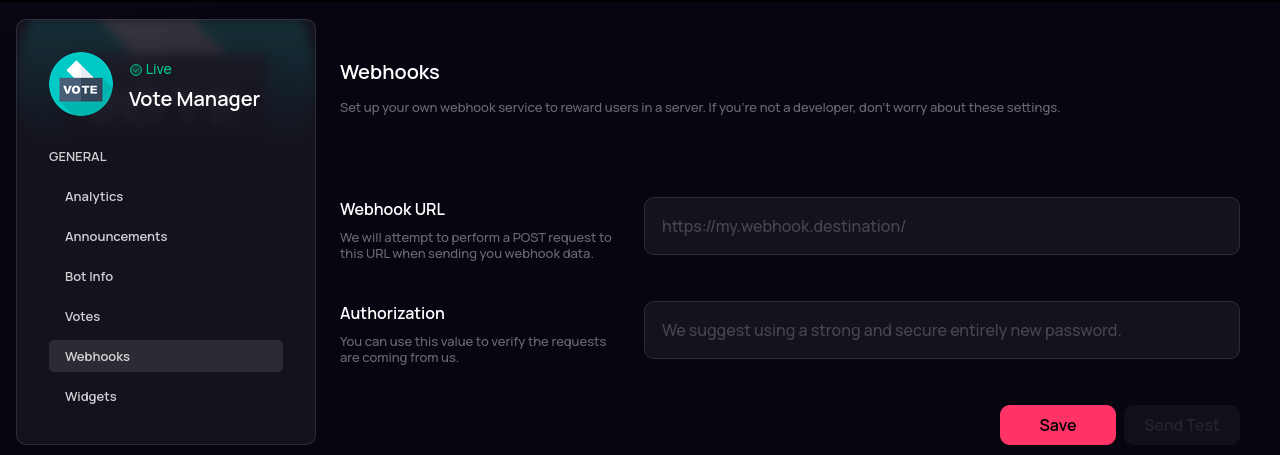
<figure><img src="https://1720966575-files.gitbook.io/~/files/v0/b/gitbook-x-prod.appspot.com/o/spaces%2FeFEtDi3YGaE1Ne03okdh%2Fuploads%2Fgit-blob-e92d2999a722a3992e9883048926614079a99917%2FBot%20Top.gg%20%231.png?alt=media" alt=""><figcaption><p>Your bots Top.gg webhooks page</p></figcaption></figure>

{% hint style="success" %}
You need to be logged in & own or be in a team that owns the bot on Top.gg to access this page
{% endhint %}

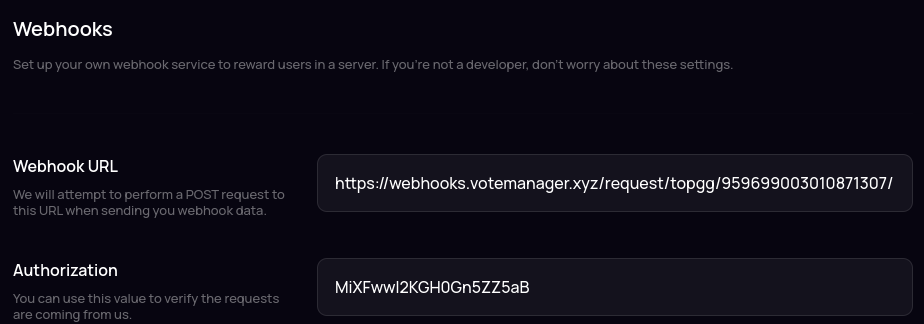
You should be taken to a page that looks like the above image. Please paste the URL provided in step two into the **Webhook URL** box. The URL should follow the format `https://webhooks.votemanager.xyz/request/[platform]/[your-bots-id]/`

**E.G.** `https://webhooks.votemanager.xyz/request/topgg/959699003010871307/`

You should then paste the passphrase shown in step six into the **Authorization** box. It should be a 20 character long string

<figure><img src="https://1720966575-files.gitbook.io/~/files/v0/b/gitbook-x-prod.appspot.com/o/spaces%2FeFEtDi3YGaE1Ne03okdh%2Fuploads%2Fgit-blob-e8da36899e709cb97bc663499a9f3aa4d471ceec%2FBot%20Top.gg%20%232.png?alt=media" alt=""><figcaption><p>Webhook URL &#x26; Authorization have been filled out</p></figcaption></figure>

If you forget or lose your passphrase you can run the `/trackers passphrase` command. Select **Bot** for the type then choose the tracker from the options and run the command

<figure><img src="https://1720966575-files.gitbook.io/~/files/v0/b/gitbook-x-prod.appspot.com/o/spaces%2FeFEtDi3YGaE1Ne03okdh%2Fuploads%2Fgit-blob-38ba89b18d4eb57aeaeb27406b26ad9fd78baf47%2Ftracker_passphrase.png?alt=media" alt=""><figcaption><p>Trackers Passphrase Command</p></figcaption></figure>

Your vote tracker is now fully setup! A message will be sent with your configured embed to the channel you configured whenever a user bumps or server on Discord Servers


# Discord Bot List

Find a more detailed description about setting up a bot on Discord Bot List with Vote Manager

{% hint style="info" %}
This continues from the tutorial on the previous page ([here](/bots/create))
{% endhint %}

To continue your setup, please go to the link shown as step one. It should look like this: `https://discordbotlist.com/bots/[your-bots-id]/edit`

**E.G.** `https://discordbotlist.com/bots/959699003010871307/edit`

You should be taken to a page that looks like the above image. Please paste the URL provided in step two into the **Webhook URL** box. The URL should follow the format `https://webhooks.votemanager.xyz/request/dbl/[your-bots-id]/`

**E.G.** `https://webhooks.votemanager.xyz/request/dbl/959699003010871307/`

You should then paste the passphrase shown in step six into the **Authorization** box. It should be a string of 20 random letters and numbers

If you forget or lose your passphrase you can run the `/trackers passphrase` command. Select **Bot** for the type then choose the tracker from the options and run the command

<figure><img src="https://1720966575-files.gitbook.io/~/files/v0/b/gitbook-x-prod.appspot.com/o/spaces%2FeFEtDi3YGaE1Ne03okdh%2Fuploads%2Fgit-blob-38ba89b18d4eb57aeaeb27406b26ad9fd78baf47%2Ftracker_passphrase.png?alt=media" alt=""><figcaption><p>Trackers Passphrase Command</p></figcaption></figure>

Your vote tracker is now fully setup! A message will be sent with your configured embed to the channel you configured whenever a user upvotes your bot


# Discords

Find a more detailed description about setting up a bot on Discords with Vote Manager

{% hint style="info" %}
This continues from the tutorial on the previous page ([here](/bots/create))
{% endhint %}

To continue your setup, please go to the link shown as step one. It should look like this: `https://discords.com/bots/bot/[your-bots-id]/edit`

**E.G.** `https://discords.com/bots/bot/959699003010871307/edit`

You should be taken to a page that looks like the above image. Please enter the URL provided in step two into the field labelled **Webhook URL**, under **Developer Values**. The URL should follow the format `https://webhooks.votemanager.xyz/request/discords/[your-bots-id]/`

**E.G.** `https://webhooks.votemanager.xyz/request/discords/959699003010871307/`

Next, paste the passphrase provided into the field labelled **Webhook Secret**. Finally, scroll down to the bottom of the page and click **Apply Changes**

If you forget or lose your passphrase you can run the `/trackers passphrase` command. Select **Bot** for the type then choose the tracker from the options and run the command

<figure><img src="https://1720966575-files.gitbook.io/~/files/v0/b/gitbook-x-prod.appspot.com/o/spaces%2FeFEtDi3YGaE1Ne03okdh%2Fuploads%2Fgit-blob-38ba89b18d4eb57aeaeb27406b26ad9fd78baf47%2Ftracker_passphrase.png?alt=media" alt=""><figcaption><p>Trackers Passphrase Command</p></figcaption></figure>

Your vote tracker is now fully setup! A message will be sent with your configured embed to the channel you configured whenever a user upvotes your bot


# Discord List

Find a more detailed description about setting up a bot on Discord List with Vote Manager

{% hint style="info" %}
This continues from the tutorial on the previous page ([here](/bots/create))
{% endhint %}

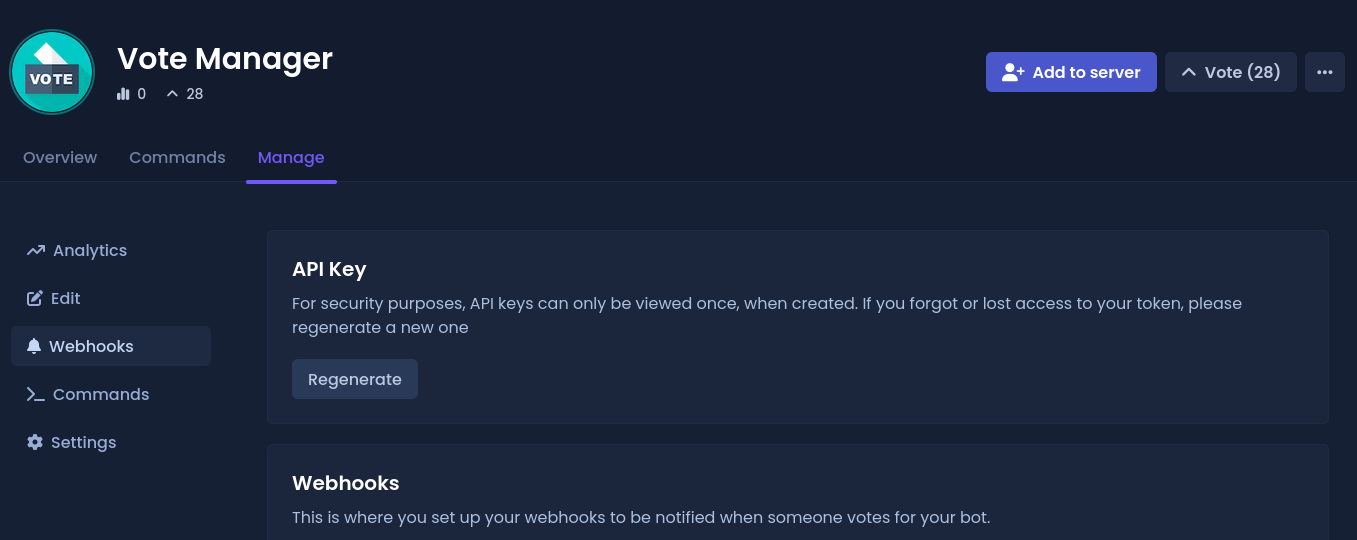
To continue your setup, please go to the link shown as step one. It should look like this: `https://discordlist.gg/bot/[your-bots-id]/manage/webhooks`

**E.G.** `https://discordlist.gg/bot/959699003010871307/manage/webhooks`

<figure><img src="https://1720966575-files.gitbook.io/~/files/v0/b/gitbook-x-prod.appspot.com/o/spaces%2FeFEtDi3YGaE1Ne03okdh%2Fuploads%2Fgit-blob-26749af1c6e1ca690f3be80777476909b1261363%2Fdlist-1.png?alt=media" alt=""><figcaption><p>Your bots Discord List webhooks page</p></figcaption></figure>

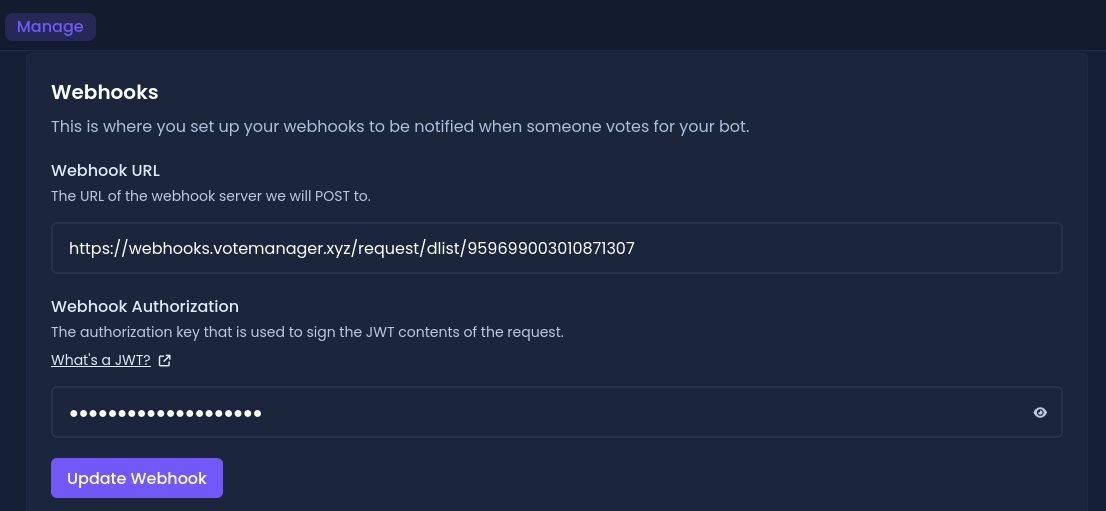
You should be taken to a page that looks like the above image. Scroll down to the **Webhooks** section and enter the URL provided in step two of the setup message into the box labelled **Webhook URL** . The URL should follow the format `https://webhooks.votemanager.xyz/request/dlist/[your-bots-id]/`

**E.G.** `https://webhooks.votemanager.xyz/request/dlist/959699003010871307/`

Then, fill in the **Webhook Authentication** field with the passphrase provided in the setup message

<figure><img src="https://1720966575-files.gitbook.io/~/files/v0/b/gitbook-x-prod.appspot.com/o/spaces%2FeFEtDi3YGaE1Ne03okdh%2Fuploads%2Fgit-blob-92b3a9dc37ee29032a4d33e67543663300be9e9b%2Fdlist-2.png?alt=media" alt=""><figcaption><p>Webhook URL &#x26; Authorization have been filled out</p></figcaption></figure>

If you forget or lose your passphrase you can run the `/trackers passphrase` command. Select **Bot** for the type then choose the tracker from the options and run the command

<figure><img src="https://1720966575-files.gitbook.io/~/files/v0/b/gitbook-x-prod.appspot.com/o/spaces%2FeFEtDi3YGaE1Ne03okdh%2Fuploads%2Fgit-blob-38ba89b18d4eb57aeaeb27406b26ad9fd78baf47%2Ftracker_passphrase.png?alt=media" alt=""><figcaption><p>Trackers Passphrase Command</p></figcaption></figure>

Your vote tracker is now fully setup! A message will be sent with your configured embed to the channel you configured whenever a user upvotes your bot


# Infinity Bots

Find a more detailed description about setting up a bot on Top.gg with Vote Manager

{% hint style="info" %}
This continues from the tutorial on the previous page ([here](/bots/create))
{% endhint %}

To continue your setup, please go to the link shown as step one. It should look like this: `https://infinitybots.gg/bot/[your-bots-id]/settings`

**E.G.** `https://infinitybots.gg/bot/959699003010871307/settings`

<figure><img src="https://1720966575-files.gitbook.io/~/files/v0/b/gitbook-x-prod.appspot.com/o/spaces%2FeFEtDi3YGaE1Ne03okdh%2Fuploads%2Fgit-blob-8dd01da806ade7122f23a2b9a437106d41945ec3%2Fibl-1.png?alt=media" alt=""><figcaption><p>Your bots Infinity Bots settings page</p></figcaption></figure>

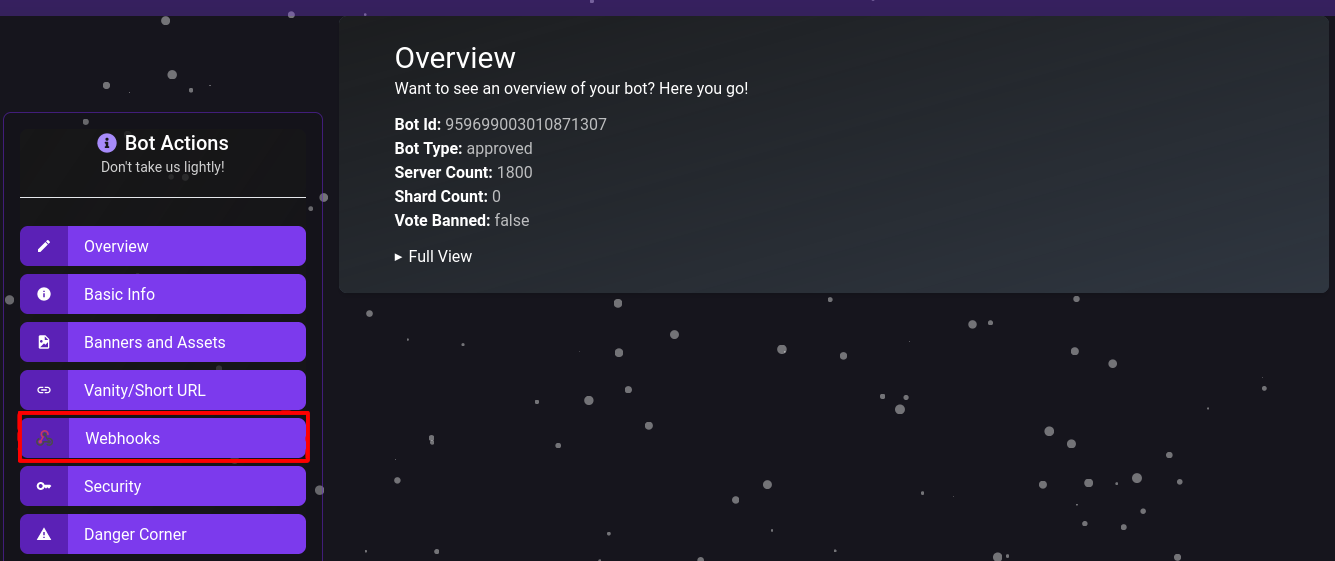
You should be taken to a page that looks like the above image. Click on the sidebar option labelled **Webhooks** to view your bots webhooks

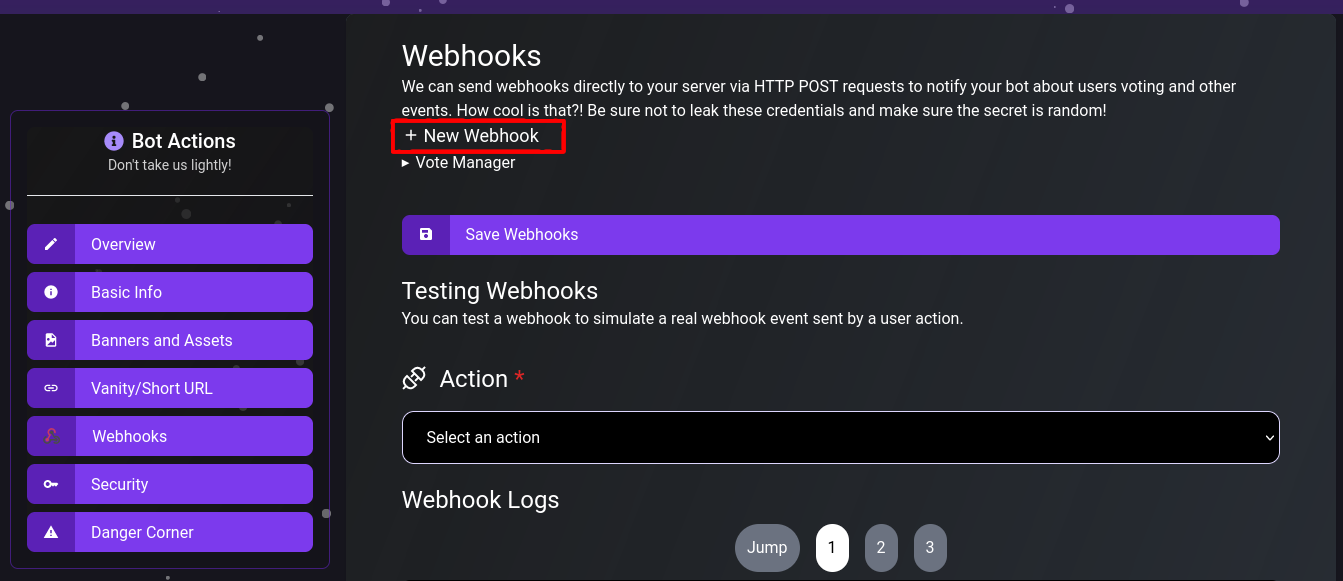
Next, click on the **+New Webhook** button show in the image below

<figure><img src="https://1720966575-files.gitbook.io/~/files/v0/b/gitbook-x-prod.appspot.com/o/spaces%2FeFEtDi3YGaE1Ne03okdh%2Fuploads%2Fgit-blob-2f23f9860af5bd8668692e5b8fda6b5c594339db%2Fibl-2.png?alt=media" alt=""><figcaption><p>Go to the Webhooks section</p></figcaption></figure>

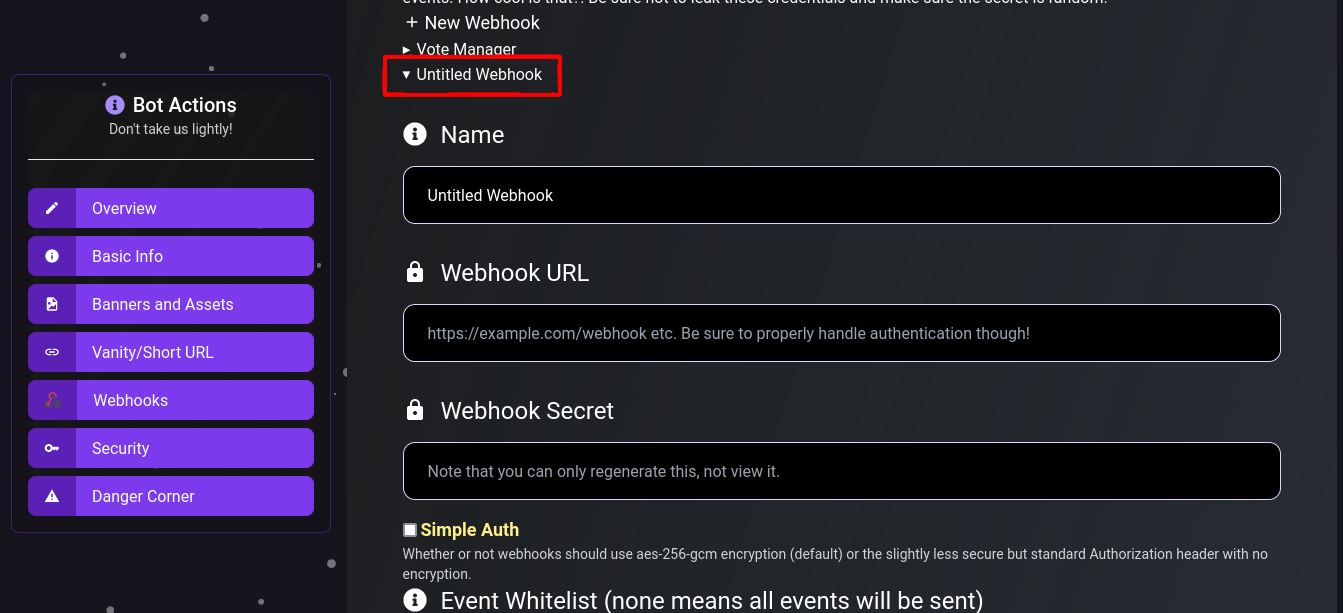
After doing so, you should see a button labelled **Untitled Webhook** appear underneath it. Clicking on it should expand to show the webhook details

<figure><img src="https://1720966575-files.gitbook.io/~/files/v0/b/gitbook-x-prod.appspot.com/o/spaces%2FeFEtDi3YGaE1Ne03okdh%2Fuploads%2Fgit-blob-a82994fc8d3a6d251d22012ca16cd140c26db9c3%2Fibl-3.png?alt=media" alt=""><figcaption></figcaption></figure>

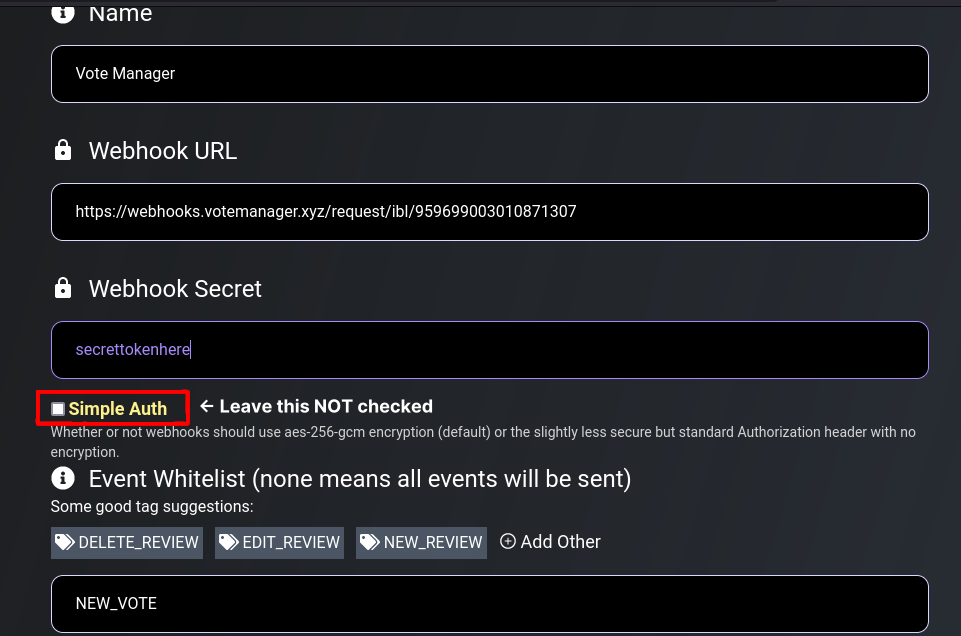
Name the webhook something that shows what it is, for example, Vote Manager. Then, paste the URL provided in step two into the **Webhook URL** box. The URL should follow the format `https://webhooks.votemanager.xyz/request/ibl/[your-bots-id]/`

**E.G.** `https://webhooks.votemanager.xyz/request/ibl/959699003010871307/`

Enter the provided Passphrase into the **Webhook Secret** field. Ensure that **Simple Auth** is left unchecked and the **Event Whitelist** contains **NEW\_VOTE** or is left empty

<figure><img src="https://1720966575-files.gitbook.io/~/files/v0/b/gitbook-x-prod.appspot.com/o/spaces%2FeFEtDi3YGaE1Ne03okdh%2Fuploads%2Fgit-blob-cc36be10b3029e004286e83ff71484717a0fecb9%2Fibl-4.png?alt=media" alt=""><figcaption><p>Webhook URL &#x26; Authorization have been filled out</p></figcaption></figure>

If you forget or lose your passphrase you can run the `/trackers passphrase` command. Select **Bot** for the type then choose the tracker from the options and run the command

<figure><img src="https://1720966575-files.gitbook.io/~/files/v0/b/gitbook-x-prod.appspot.com/o/spaces%2FeFEtDi3YGaE1Ne03okdh%2Fuploads%2Fgit-blob-38ba89b18d4eb57aeaeb27406b26ad9fd78baf47%2Ftracker_passphrase.png?alt=media" alt=""><figcaption><p>Trackers Passphrase Command</p></figcaption></figure>

Your vote tracker is now fully setup! A message will be sent with your configured embed to the channel you configured whenever a user upvotes your bot


# Botlist.me

Find a more detailed description about setting up a bot on Botlist.me with Vote Manager

{% hint style="info" %}
This continues from the tutorial on the previous page ([here](/bots/create))
{% endhint %}

To continue your setup, please go to the link shown as step one. It should look like this: `https://botlist.me/bot/[your-bots-id]/edit`

**E.G.** `https://botlist.me/bot/959699003010871307/edit`

<figure><img src="https://1720966575-files.gitbook.io/~/files/v0/b/gitbook-x-prod.appspot.com/o/spaces%2FeFEtDi3YGaE1Ne03okdh%2Fuploads%2Fgit-blob-1051c52daf63fb1bb5cf73fa845b6fcc5a7c8724%2Fbotlist-1.png?alt=media" alt=""><figcaption><p>Your bots Botlist.me settings page</p></figcaption></figure>

You should be taken to a page that looks like the above image. Scroll down find the fields labelled **Webhook URL** and **Webhook Authorization** near the bottom.

<figure><img src="https://1720966575-files.gitbook.io/~/files/v0/b/gitbook-x-prod.appspot.com/o/spaces%2FeFEtDi3YGaE1Ne03okdh%2Fuploads%2Fgit-blob-cc4eada72d843247f8d1b5f4643f7f34d676c73e%2Fbotlist-2.png?alt=media" alt=""><figcaption><p>Scroll down to the webhook options</p></figcaption></figure>

Please paste the URL provided in step two into the **Webhook URL** box. The URL should follow the format `https://webhooks.votemanager.xyz/request/botlist/[your-bots-id]/`

**E.G.** `https://webhooks.votemanager.xyz/request/botlist/959699003010871307/`

Next, enter the provided passphrase into the **Webhook Authorization** field

Once you have filled out the required fields, click the **Edit** button to save your changes

<figure><img src="https://1720966575-files.gitbook.io/~/files/v0/b/gitbook-x-prod.appspot.com/o/spaces%2FeFEtDi3YGaE1Ne03okdh%2Fuploads%2Fgit-blob-9f348ca56cc8a0c7d2818bdb209e3a2f4a860e65%2Fbotlist-3.png?alt=media" alt=""><figcaption><p>Webhook URL &#x26; Authorization have been filled out</p></figcaption></figure>

If you forget or lose your passphrase you can run the `/trackers passphrase` command. Select **Bot** for the type then choose the tracker from the options and run the command

<figure><img src="https://1720966575-files.gitbook.io/~/files/v0/b/gitbook-x-prod.appspot.com/o/spaces%2FeFEtDi3YGaE1Ne03okdh%2Fuploads%2Fgit-blob-38ba89b18d4eb57aeaeb27406b26ad9fd78baf47%2Ftracker_passphrase.png?alt=media" alt=""><figcaption><p>Trackers Passphrase Command</p></figcaption></figure>

Your vote tracker is now fully setup! A message will be sent with your configured embed to the channel you configured whenever a user upvotes your bot


# Void Bots

Find a more detailed description about setting up a bot on Void Bots with Vote Manager

{% hint style="info" %}
This continues from the tutorial on the previous page ([here](/bots/create))
{% endhint %}

To continue your setup, please go to the link shown as step one. It should look like this: `https://voidbots.net/bot/[your-bots-id]/webhooks`

**E.G.** `https://voidbots.net/bot/959699003010871307/webhooks`

<figure><img src="https://1720966575-files.gitbook.io/~/files/v0/b/gitbook-x-prod.appspot.com/o/spaces%2FeFEtDi3YGaE1Ne03okdh%2Fuploads%2Fgit-blob-b2f40ee9e7af06f71be55542c1ef6c037c4433b4%2Fvoidbots-1.png?alt=media" alt=""><figcaption><p>Your bots Void Bots webhook settings page</p></figcaption></figure>

Please paste the URL provided in step two into the **Webhook URL** box. The URL should follow the format `https://webhooks.votemanager.xyz/request/voidbots/[your-bots-id]/`

**E.G.** `https://webhooks.votemanager.xyz/request/voidbots/959699003010871307/`

Next, enter the provided passphrase into the **Authorization** field

Once you have filled out the required fields, click the **Edit** button to save your changes

<figure><img src="https://1720966575-files.gitbook.io/~/files/v0/b/gitbook-x-prod.appspot.com/o/spaces%2FeFEtDi3YGaE1Ne03okdh%2Fuploads%2Fgit-blob-a082bd2674037adf1fdcce53030b8ba8c099bab1%2Fvoidbots-2.png?alt=media" alt=""><figcaption><p>Webhook URL &#x26; Authorization have been filled out</p></figcaption></figure>

If you forget or lose your passphrase you can run the `/trackers passphrase` command. Select **Bot** for the type then choose the tracker from the options and run the command

<figure><img src="https://1720966575-files.gitbook.io/~/files/v0/b/gitbook-x-prod.appspot.com/o/spaces%2FeFEtDi3YGaE1Ne03okdh%2Fuploads%2Fgit-blob-38ba89b18d4eb57aeaeb27406b26ad9fd78baf47%2Ftracker_passphrase.png?alt=media" alt=""><figcaption><p>Trackers Passphrase Command</p></figcaption></figure>

Your vote tracker is now fully setup! A message will be sent with your configured embed to the channel you configured whenever a user upvotes your bot


# Discord Place

Find a more detailed description about setting up a bot on Void Bots with Vote Manager

{% hint style="info" %}
This continues from the tutorial on the previous page ([here](/bots/create))
{% endhint %}

To continue your setup, please go to the link shown as step one. It should look like this: `https://voidbots.net/bot/[your-bots-id]/webhooks`

**E.G.** `https://voidbots.net/bot/959699003010871307/webhooks`

<figure><img src="https://1720966575-files.gitbook.io/~/files/v0/b/gitbook-x-prod.appspot.com/o/spaces%2FeFEtDi3YGaE1Ne03okdh%2Fuploads%2Fgit-blob-b2f40ee9e7af06f71be55542c1ef6c037c4433b4%2Fvoidbots-1.png?alt=media" alt=""><figcaption><p>Your bots Void Bots webhook settings page</p></figcaption></figure>

Please paste the URL provided in step two into the **Webhook URL** box. The URL should follow the format `https://webhooks.votemanager.xyz/request/voidbots/[your-bots-id]/`

**E.G.** `https://webhooks.votemanager.xyz/request/voidbots/959699003010871307/`

Next, enter the provided passphrase into the **Authorization** field

Once you have filled out the required fields, click the **Edit** button to save your changes

<figure><img src="https://1720966575-files.gitbook.io/~/files/v0/b/gitbook-x-prod.appspot.com/o/spaces%2FeFEtDi3YGaE1Ne03okdh%2Fuploads%2Fgit-blob-a082bd2674037adf1fdcce53030b8ba8c099bab1%2Fvoidbots-2.png?alt=media" alt=""><figcaption><p>Webhook URL &#x26; Authorization have been filled out</p></figcaption></figure>

If you forget or lose your passphrase you can run the `/trackers passphrase` command. Select **Bot** for the type then choose the tracker from the options and run the command

<figure><img src="https://1720966575-files.gitbook.io/~/files/v0/b/gitbook-x-prod.appspot.com/o/spaces%2FeFEtDi3YGaE1Ne03okdh%2Fuploads%2Fgit-blob-38ba89b18d4eb57aeaeb27406b26ad9fd78baf47%2Ftracker_passphrase.png?alt=media" alt=""><figcaption><p>Trackers Passphrase Command</p></figcaption></figure>

Your vote tracker is now fully setup! A message will be sent with your configured embed to the channel you configured whenever a user upvotes your bot


# BHList

Find a more detailed description about setting up a bot on Void Bots with Vote Manager

{% hint style="info" %}
This continues from the tutorial on the previous page ([here](/bots/create))
{% endhint %}

To continue your setup, please go to the link shown as step one. It should look like this: `https://voidbots.net/bot/[your-bots-id]/webhooks`

**E.G.** `https://voidbots.net/bot/959699003010871307/webhooks`

<figure><img src="https://1720966575-files.gitbook.io/~/files/v0/b/gitbook-x-prod.appspot.com/o/spaces%2FeFEtDi3YGaE1Ne03okdh%2Fuploads%2Fgit-blob-b2f40ee9e7af06f71be55542c1ef6c037c4433b4%2Fvoidbots-1.png?alt=media" alt=""><figcaption><p>Your bots Void Bots webhook settings page</p></figcaption></figure>

Please paste the URL provided in step two into the **Webhook URL** box. The URL should follow the format `https://webhooks.votemanager.xyz/request/voidbots/[your-bots-id]/`

**E.G.** `https://webhooks.votemanager.xyz/request/voidbots/959699003010871307/`

Next, enter the provided passphrase into the **Authorization** field

Once you have filled out the required fields, click the **Edit** button to save your changes

<figure><img src="https://1720966575-files.gitbook.io/~/files/v0/b/gitbook-x-prod.appspot.com/o/spaces%2FeFEtDi3YGaE1Ne03okdh%2Fuploads%2Fgit-blob-a082bd2674037adf1fdcce53030b8ba8c099bab1%2Fvoidbots-2.png?alt=media" alt=""><figcaption><p>Webhook URL &#x26; Authorization have been filled out</p></figcaption></figure>

If you forget or lose your passphrase you can run the `/trackers passphrase` command. Select **Bot** for the type then choose the tracker from the options and run the command

<figure><img src="https://1720966575-files.gitbook.io/~/files/v0/b/gitbook-x-prod.appspot.com/o/spaces%2FeFEtDi3YGaE1Ne03okdh%2Fuploads%2Fgit-blob-38ba89b18d4eb57aeaeb27406b26ad9fd78baf47%2Ftracker_passphrase.png?alt=media" alt=""><figcaption><p>Trackers Passphrase Command</p></figcaption></figure>

Your vote tracker is now fully setup! A message will be sent with your configured embed to the channel you configured whenever a user upvotes your bot


# Rovel Stars

Find a more detailed description about setting up a bot on Void Bots with Vote Manager

{% hint style="info" %}
This continues from the tutorial on the previous page ([here](/bots/create))
{% endhint %}

To continue your setup, please go to the link shown as step one. It should look like this: `https://voidbots.net/bot/[your-bots-id]/webhooks`

**E.G.** `https://voidbots.net/bot/959699003010871307/webhooks`

<figure><img src="https://1720966575-files.gitbook.io/~/files/v0/b/gitbook-x-prod.appspot.com/o/spaces%2FeFEtDi3YGaE1Ne03okdh%2Fuploads%2Fgit-blob-b2f40ee9e7af06f71be55542c1ef6c037c4433b4%2Fvoidbots-1.png?alt=media" alt=""><figcaption><p>Your bots Void Bots webhook settings page</p></figcaption></figure>

Please paste the URL provided in step two into the **Webhook URL** box. The URL should follow the format `https://webhooks.votemanager.xyz/request/voidbots/[your-bots-id]/`

**E.G.** `https://webhooks.votemanager.xyz/request/voidbots/959699003010871307/`

Next, enter the provided passphrase into the **Authorization** field

Once you have filled out the required fields, click the **Edit** button to save your changes

<figure><img src="https://1720966575-files.gitbook.io/~/files/v0/b/gitbook-x-prod.appspot.com/o/spaces%2FeFEtDi3YGaE1Ne03okdh%2Fuploads%2Fgit-blob-a082bd2674037adf1fdcce53030b8ba8c099bab1%2Fvoidbots-2.png?alt=media" alt=""><figcaption><p>Webhook URL &#x26; Authorization have been filled out</p></figcaption></figure>

If you forget or lose your passphrase you can run the `/trackers passphrase` command. Select **Bot** for the type then choose the tracker from the options and run the command

<figure><img src="https://1720966575-files.gitbook.io/~/files/v0/b/gitbook-x-prod.appspot.com/o/spaces%2FeFEtDi3YGaE1Ne03okdh%2Fuploads%2Fgit-blob-38ba89b18d4eb57aeaeb27406b26ad9fd78baf47%2Ftracker_passphrase.png?alt=media" alt=""><figcaption><p>Trackers Passphrase Command</p></figcaption></figure>

Your vote tracker is now fully setup! A message will be sent with your configured embed to the channel you configured whenever a user upvotes your bot


# TopCord

Find a more detailed description about setting up a bot on TopCord with Vote Manager

{% hint style="info" %}
This continues from the tutorial on the previous page ([here](/bots/create))
{% endhint %}

To continue your setup, please go to the link shown as step one. It should look like this: `https://topcord.xyz/bot/[your-bots-id]/edit`

**E.G.** `https://topcord.xyz/bot/959699003010871307/edit`

You should be taken to your bots TopCord settings page. Enter the URL provided in step two of the setup message into the **Webhook URL** field. The URL should follow the format `https://webhooks.votemanager.xyz/request/topcord/[your-bots-id]/`

**E.G.** `https://webhooks.votemanager.xyz/request/topcord/959699003010871307/`

Next, paste the passphrase provided in step six of the setup message into the **Authorization** box. Finally, save your changes

If you forget or lose your passphrase you can run the `/trackers passphrase` command. Select **Bot** for the type then choose the tracker from the options and run the command

<figure><img src="https://1720966575-files.gitbook.io/~/files/v0/b/gitbook-x-prod.appspot.com/o/spaces%2FeFEtDi3YGaE1Ne03okdh%2Fuploads%2Fgit-blob-38ba89b18d4eb57aeaeb27406b26ad9fd78baf47%2Ftracker_passphrase.png?alt=media" alt=""><figcaption><p>Trackers Passphrase Command</p></figcaption></figure>

Your vote tracker is now fully setup! A message will be sent with your configured embed to the channel you configured whenever a user upvotes your bot


# Editing

Made a slight typo in your vote embed? Need to change the vote message channel? You can edit your setup using the steps below

{% hint style="warning" %}
This requires you to already have an existing setup for the bot on the platform you want to edit
{% endhint %}

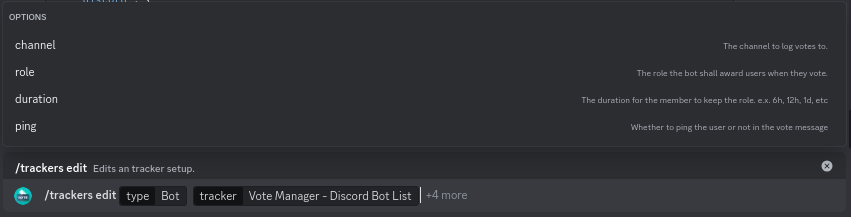
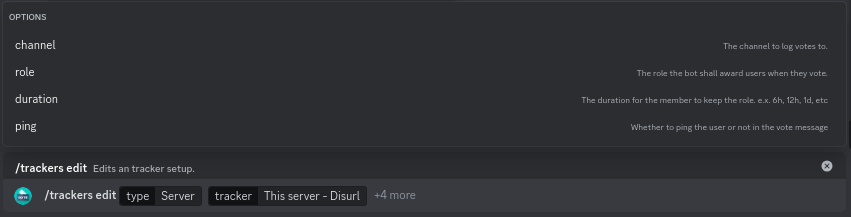
To edit a vote tracker, simply run the `/trackers edit` command and fill in the required options.

<figure><img src="https://1720966575-files.gitbook.io/~/files/v0/b/gitbook-x-prod.appspot.com/o/spaces%2FeFEtDi3YGaE1Ne03okdh%2Fuploads%2Fgit-blob-c35eeb497df30761c7059182a6ee9d69f28830ce%2Ftracker_edit.png?alt=media" alt=""><figcaption><p>Trackers Edit Command</p></figcaption></figure>

Use the optional `channel`, `role` & `duration` parameters to change the respective settings for the vote tracker. Any options left blank will retain their previous value

{% tabs %}
{% tab title="Required Options" %}

* `type` - The type of tracker (select **Bot**)
* `tracker` - The tracker you wish to edit
  {% endtab %}

{% tab title="Optional Options" %}

* `channel` - Channel to send your vote message in
* `role` - Role to be given to users after they vote
* `duration` - How long user should keep the role specified above
  {% endtab %}
  {% endtabs %}

<figure><img src="https://1720966575-files.gitbook.io/~/files/v0/b/gitbook-x-prod.appspot.com/o/spaces%2FeFEtDi3YGaE1Ne03okdh%2Fuploads%2Fgit-blob-5c2255ac0caf071e6e1850771639f9ffbd84aac3%2Ftrackers_edit_bot.png?alt=media" alt=""><figcaption><p>Options have been filled out</p></figcaption></figure>

{% hint style="info" %}
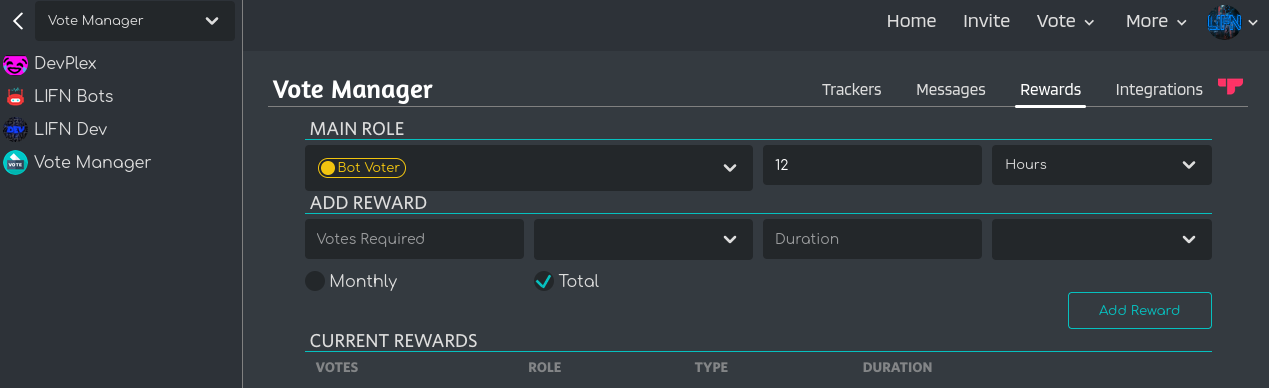
Other rewards can be managed via the `/rewards` command (more details [here](https://github.com/vote-manager/docs/blob/main/bots/broken-reference/README.md))
{% endhint %}

Once you have run the `/trackers edit` command, the vote message embed will appear, allowing your vote embed to be updated. If you wish to leave your vote embed the same, simply press <mark style="color:purple;">**Submit**</mark>

<figure><img src="https://1720966575-files.gitbook.io/~/files/v0/b/gitbook-x-prod.appspot.com/o/spaces%2FeFEtDi3YGaE1Ne03okdh%2Fuploads%2Fgit-blob-72a61e24e7d74559e963d484aa5c02004fc2c6f1%2FBot%20Create%20%233.png?alt=media" alt=""><figcaption><p>Vote Message Embed Builder</p></figcaption></figure>

{% hint style="info" %}
You can use variables to have vote information in your vote message. see [here](/variables) for more details
{% endhint %}

{% tabs %}
{% tab title="Required Fields" %}

* **Title** - title of the embed
  * <mark style="color:green;">**✓**</mark> <mark style="color:green;">- Variables are supported</mark>
  * <mark style="color:green;">**✓**</mark> <mark style="color:green;">- Markdown is supported</mark>
* **Color** - color of the left border on the embed
  * <mark style="color:green;">**✓**</mark> <mark style="color:green;">- Variables are supported</mark>
  * <mark style="color:red;">**✗**</mark> <mark style="color:red;">- Markdown is not supported</mark>
  * <mark style="color:green;">**✓**</mark> <mark style="color:green;">- Allowed formats</mark>
    * Hex code (Ex `#0bbbb7`)
    * Integer (Ex `0x0bbbb7`)
    * RGB color values (Ex `11, 187, 183`)
    * Preset (Ex `Red`)
* **Description** - main content of the embed
  * <mark style="color:green;">**✓**</mark> <mark style="color:green;">- Variables are supported</mark>
  * <mark style="color:green;">**✓**</mark> <mark style="color:green;">- Markdown is supported</mark>
* **Footer** - small text at the bottom of the embed
  * <mark style="color:green;">**✓**</mark> <mark style="color:green;">- Variables are supported</mark>
  * <mark style="color:red;">**✗**</mark> <mark style="color:red;">- Markdown is not supported</mark>
    {% endtab %}

{% tab title="Optional Fields" %}

* **Image** - Big image in the embed. Appears below the description
  * <mark style="color:green;">**✓**</mark> <mark style="color:green;">- Variables are supported</mark>
  * <mark style="color:red;">**✗**</mark> <mark style="color:red;">- Markdown is not supported</mark>
  * <mark style="color:green;">**✓**</mark> <mark style="color:green;">- Allowed formats</mark>
    * Any `https`or `http` link to an image file
      {% endtab %}
      {% endtabs %}


# Deleting

We don't like to see you go but, if you do you might want to delete your vote tracker. The steps below will help you to do so

{% hint style="danger" %}
Deletion of your setup generally can't be undone and is final. See below for a list of things deleted when you delete your setup
{% endhint %}

Should you need to delete a vote tracker at any point, you can use the `/trackers delete` command. Simply fill in the required options and run the command

<figure><img src="https://1720966575-files.gitbook.io/~/files/v0/b/gitbook-x-prod.appspot.com/o/spaces%2FeFEtDi3YGaE1Ne03okdh%2Fuploads%2Fgit-blob-a85d2c3bac0f8f65ed7c5dad34d8af8a3adb5b31%2Ftracker_delete.png?alt=media" alt=""><figcaption><p>Trackers Delete command</p></figcaption></figure>

{% tabs %}
{% tab title="Required Options" %}

* `type` - The type of tracker (select **Bot**)
* `tracker` - The tracker you wish to edit
  {% endtab %}
  {% endtabs %}

<figure><img src="https://1720966575-files.gitbook.io/~/files/v0/b/gitbook-x-prod.appspot.com/o/spaces%2FeFEtDi3YGaE1Ne03okdh%2Fuploads%2Fgit-blob-1d78cbe2e10f8d7d5c49ed1572258faf7905873b%2Ftrackers_delete_bot.png?alt=media" alt=""><figcaption><p>Options have been filled out</p></figcaption></figure>

Once you run the command, the setup for the provided bot on the provided platform will be deleted along with all cached votes. Please see below for more details on what gets deleted by the `/trackers delete` command and what to do if you accidentally delete your setup

**Please note that there is currently no conformation for setup deletion!**

{% hint style="success" %}
We recommend also removing the webhook URL & Authentication from your bots page of the platform provided
{% endhint %}

#### Setup Deletion Includes

* Loss of vote tracking functionality on for the provided bot on the provided platform
* Loss of embed customisation, you will have to provide this information again if you chose to set up your bot with Vote Manager again
* Loss of all cached vote counts (for the vote leaderboard)

#### Setup Deletion Doesn't Include

* Change or loss of your bots actual vote count of the provided platform
* Deletion of tracker on other platforms for your bot

#### Accidental Setup Deletion

If you got a bit too excited running commands, or you just selected the wrong option and your setup got deleted by mistake, you can contact us either by [email](mailto:contact@votemanager.xyz) or in our [discord server](https://votemanager.xyz/discord). If you can provide proof of ownership or an admin position and a recent vote leaderboard, we can try to restore your bots cached vote counts and leaderboard. **We can't guarantee that we will be able to restore your data**


# Creating

Vote Manager supports vote tracking for servers on Top.gg & Discord Servers. Below, you can find information about how to set up Vote Manager for your Discord Bot

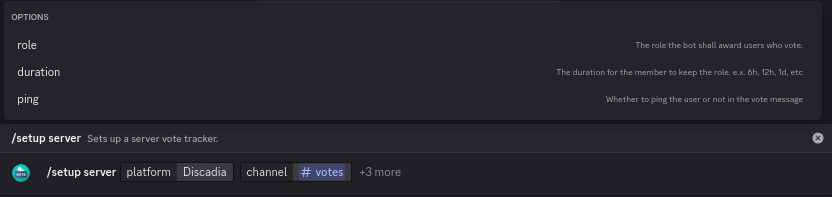
To get started with setup, run the `/setup server` command and fill in the options

<figure><img src="https://1720966575-files.gitbook.io/~/files/v0/b/gitbook-x-prod.appspot.com/o/spaces%2FeFEtDi3YGaE1Ne03okdh%2Fuploads%2Fgit-blob-2bfa888e815f33d0a8874e8a9201bb46d7e94d61%2Fsetup_server_1.png?alt=media" alt=""><figcaption><p>Setup Command</p></figcaption></figure>

{% tabs %}
{% tab title="Required Options" %}

* `platform` - The platform you want to setup the vote tracker on
  {% endtab %}

{% tab title="Optional Options" %}

* `role` - Role to be given to users after they vote
* `duration` - How long user should keep the role specified above
* `ping` - Should the voter be pinged in the vote message
* `channel` - The channel to send your vote message in
  {% endtab %}
  {% endtabs %}

<figure><img src="https://1720966575-files.gitbook.io/~/files/v0/b/gitbook-x-prod.appspot.com/o/spaces%2FeFEtDi3YGaE1Ne03okdh%2Fuploads%2Fgit-blob-354a502adae9bebfca7d0aa6568af2a7ef5d27cb%2Fsetup_server_2.png?alt=media" alt=""><figcaption><p>Options have been filled out</p></figcaption></figure>

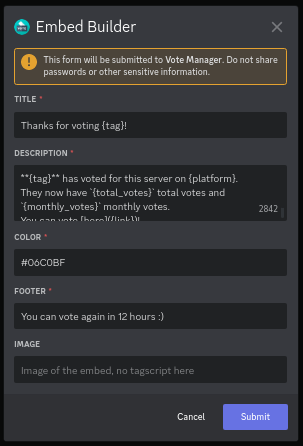
Once you have filled out the options, run the command. Upon doing so, a pop-up will appear allowing you to customise the embed on your vote message. Please see below for details about required & optional fields as well as default values

<figure><img src="https://1720966575-files.gitbook.io/~/files/v0/b/gitbook-x-prod.appspot.com/o/spaces%2FeFEtDi3YGaE1Ne03okdh%2Fuploads%2Fgit-blob-5c7e358862abfb84232aba2cc138bbab2126c11d%2FServer%20Create%20%233.png?alt=media" alt=""><figcaption><p>Vote Embed Builder</p></figcaption></figure>

{% hint style="info" %}
You can use variables to have vote information in your vote message. see [here](/variables) for more details
{% endhint %}

{% tabs %}
{% tab title="Required Fields" %}

* **Title** - title of the embed
  * <mark style="color:green;">**✓**</mark> <mark style="color:green;">- Variables are supported</mark>
  * <mark style="color:green;">**✓**</mark> <mark style="color:green;">- Markdown is supported</mark>
* **Color** - color of the left border on the embed
  * <mark style="color:green;">**✓**</mark> <mark style="color:green;">- Variables are supported</mark>
  * <mark style="color:red;">**✗**</mark> <mark style="color:red;">- Markdown is not supported</mark>
  * <mark style="color:green;">**✓**</mark> <mark style="color:green;">- Allowed formats</mark>
    * Hex code (Ex `#0bbbb7`)
    * Integer (Ex `0x0bbbb7`)
    * RGB color values (Ex `11, 187, 183`)
    * Preset (Ex `Red`)
* **Description** - main content of the embed
  * <mark style="color:green;">**✓**</mark> <mark style="color:green;">- Variables are supported</mark>
  * <mark style="color:green;">**✓**</mark> <mark style="color:green;">- Markdown is supported</mark>
* **Footer** - small text at the bottom of the embed
  * <mark style="color:green;">**✓**</mark> <mark style="color:green;">- Variables are supported</mark>
  * <mark style="color:red;">**✗**</mark> <mark style="color:red;">- Markdown is not supported</mark>
    {% endtab %}

{% tab title="Optional Fields" %}

* **Image** - big image in the embed. Appears below the description
  * <mark style="color:green;">**✓**</mark> <mark style="color:green;">- Variables are supported</mark>
  * <mark style="color:red;">**✗**</mark> <mark style="color:red;">- Markdown is not supported</mark>
  * <mark style="color:green;">**✓**</mark> <mark style="color:green;">- Allowed formats</mark>
    * Any `https`or `http` link to an image file
      {% endtab %}
      {% endtabs %}

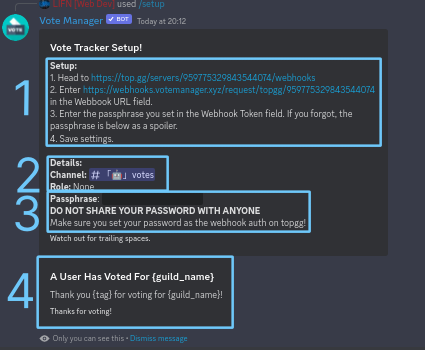
Once you have made your custom embed, press the submit button. This will close the pop-up, and you will be sent a message similar to the following

<figure><img src="https://1720966575-files.gitbook.io/~/files/v0/b/gitbook-x-prod.appspot.com/o/spaces%2FeFEtDi3YGaE1Ne03okdh%2Fuploads%2Fgit-blob-e8e4da8c04520fa7e8ee79de7140379778e2268f%2FServer%20Create%20%234.png?alt=media" alt=""><figcaption><p>Last step in Discord</p></figcaption></figure>

* **1**: These are the next steps for your setup. You can find more detail about them by going to the page in our docs for the bot list you are using:
  * [Discord Servers](/servers/create/discord-servers)
  * [Disurl](/servers/create/disurl)
  * [Infinity Bots](/servers/create/ibl)
  * [Discadia](/servers/create/discadia)
  * [Discord Place](/servers/create/discord-place)
* **2**: Details about your vote tracker including the channel, role & duration
* **3**: This is the authentication password for your tracker. **Do not share this with anyone else!** We also recommend keeping this somewhere safe as you may need it later
* **4:** The second embed is a preview of your vote message

To continue your setup, please go to the URL provided in the above embed (#1). Here you should find a place to input the webhook URL provided in the above embed (#2) and the password (#6). If you can't find it please go to our docs page from the bot list you are using.


# Top.gg

Find a more detailed description about setting up a server on Top.gg with Vote Manager

{% hint style="danger" %}
Top.gg has how deprecated server listing. You can no longer create new trackers for servers on Top.gg and we recommend you delete existing ones
{% endhint %}

{% hint style="info" %}
This continues from the tutorial on the previous page ([here](/bots/create))
{% endhint %}

To continue your setup, please go to the link shown as step one. It should look like this: `https://top.gg/servers/[your-servers-id]/webhooks`

**E.G.** `https://top.gg/servers/959699003010871307/webhooks`

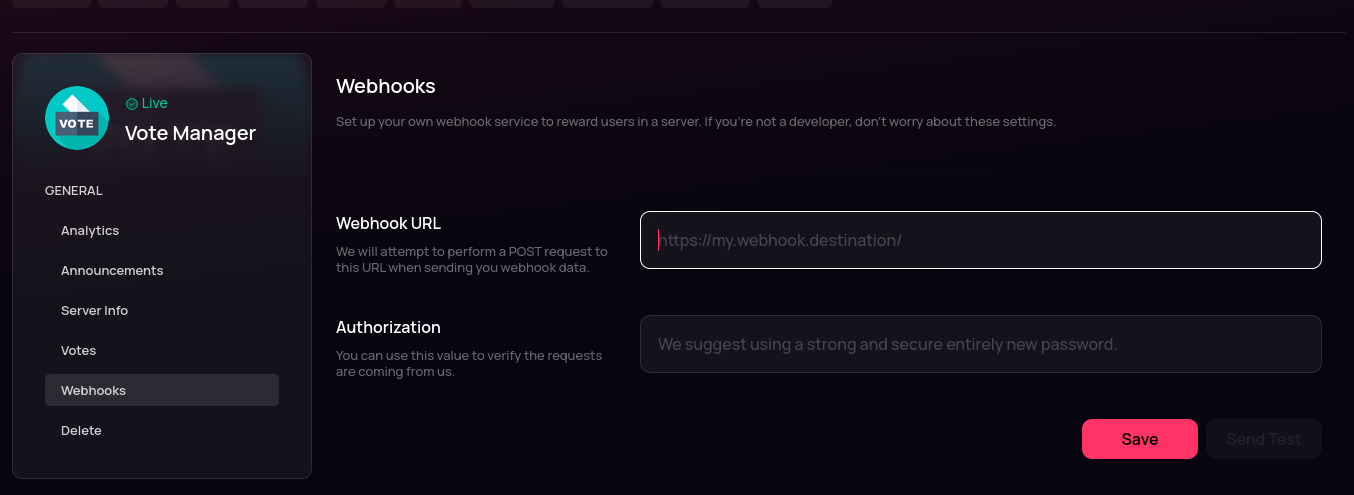
<figure><img src="https://1720966575-files.gitbook.io/~/files/v0/b/gitbook-x-prod.appspot.com/o/spaces%2FeFEtDi3YGaE1Ne03okdh%2Fuploads%2Fgit-blob-b122e70f6570e07ae0ebbd12dfe72ba89bc0cc2d%2Ftopgg-1.png?alt=media" alt=""><figcaption><p>Your servers Top.gg webhooks page</p></figcaption></figure>

{% hint style="success" %}
You need to be logged in & own or be in a team that owns the server on Top.gg to access this page
{% endhint %}

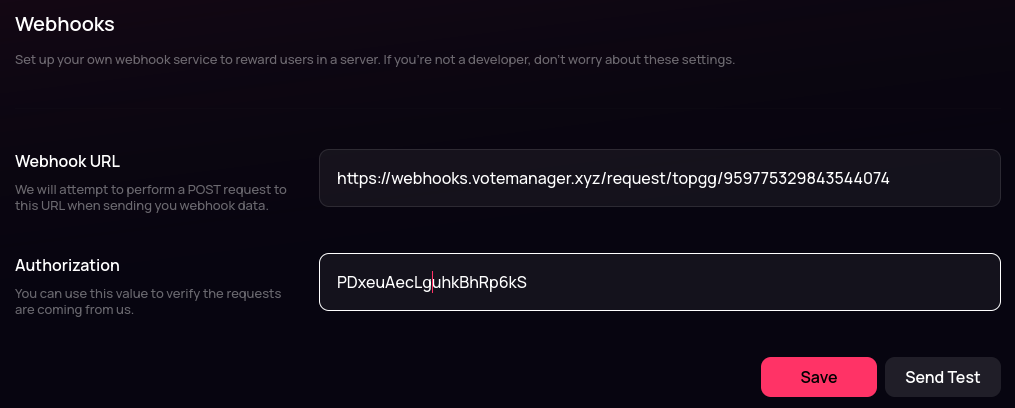
You should be taken to a page that looks like the above image. Please paste the URL provided in step two into the **Webhook URL** box. The URL should follow the format `https://webhooks.votemanager.xyz/request/topgg/[your-servers-id]/`

**E.G.** `https://webhooks.votemanager.xyz/request/topgg/959775329843544074/`

You should then paste the passphrase shown in step six into the **Authorization** box. It should be a 20 character long string

<figure><img src="https://1720966575-files.gitbook.io/~/files/v0/b/gitbook-x-prod.appspot.com/o/spaces%2FeFEtDi3YGaE1Ne03okdh%2Fuploads%2Fgit-blob-1204f0dff1f156d47976098c20fa71e1209398b2%2Ftopgg-2.png?alt=media" alt=""><figcaption><p>Webhook URL &#x26; Authorization have been filled out</p></figcaption></figure>

After entering the required details, click **Save**. Your vote tracker is now fully setup! A message will be sent with your configured embed to the channel you configured whenever a user votes for your server on Top.gg

If you forget or lose your passphrase you can run the `/trackers passphrase` command. Select **Server** for the type then choose the tracker from the options and run the command

<figure><img src="https://1720966575-files.gitbook.io/~/files/v0/b/gitbook-x-prod.appspot.com/o/spaces%2FeFEtDi3YGaE1Ne03okdh%2Fuploads%2Fgit-blob-38ba89b18d4eb57aeaeb27406b26ad9fd78baf47%2Ftracker_passphrase.png?alt=media" alt=""><figcaption><p>Trackers Passphrase Command</p></figcaption></figure>


# Discord Servers

Find a more detailed description about setting up a server on Discord Servers with Vote Manager

{% hint style="info" %}
This continues from the tutorial on the previous page ([here](/servers/create))
{% endhint %}

To continue your setup, please go to the link shown as step one. It should look like this: `https://discordservers.com/pannel/[your-servers-id]/webhooks`

**E.G.** `https://discordservers.com/panel/959775329843544074/webhooks`

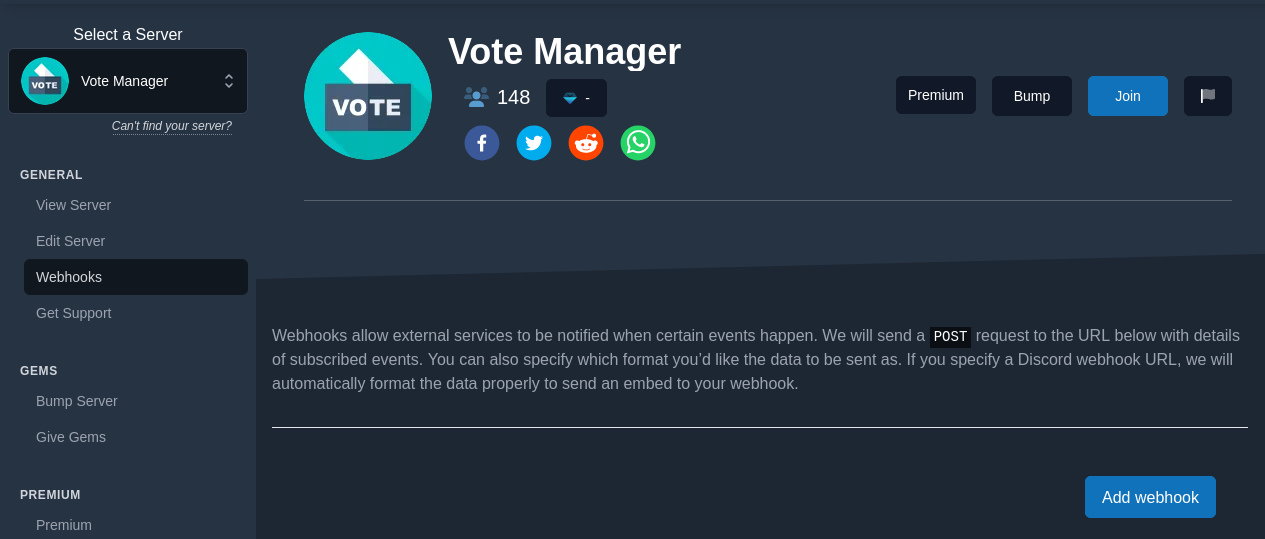
<figure><img src="https://1720966575-files.gitbook.io/~/files/v0/b/gitbook-x-prod.appspot.com/o/spaces%2FeFEtDi3YGaE1Ne03okdh%2Fuploads%2Fgit-blob-11d2386286dd37457f8e47bb943b9863e035498d%2FServer%20Dservers%20%231.png?alt=media" alt=""><figcaption><p>Your servers Discord Servers webhooks page</p></figcaption></figure>

You should be taken to a page that looks like the above image. Click on the **Add Webhook** in the bottom right

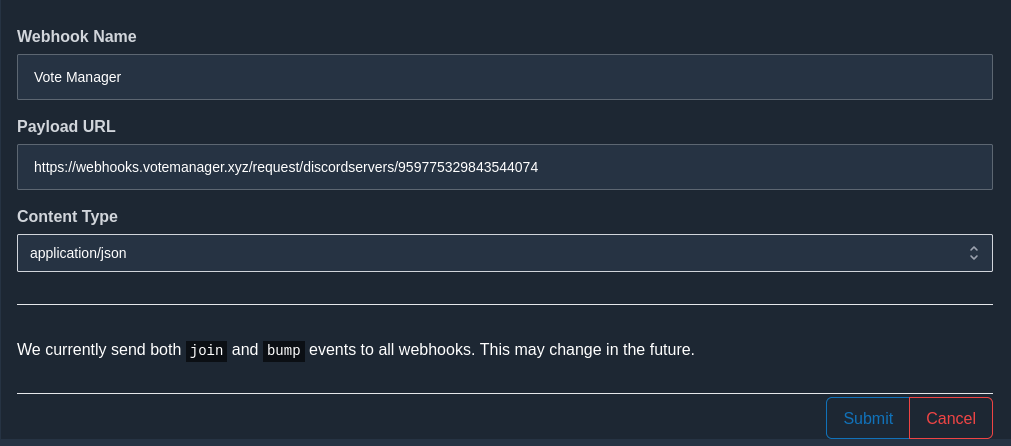
Name the webhook something that shows what it is, for example, Vote Manager. Then, paste the URL provided in step two into the **Payload URL** box. The URL should follow the format `https://webhooks.votemanager.xyz/request/discordservers/[your-servers-id]/`

**E.G.** `https://webhooks.votemanager.xyz/request/discordservers/959775329843544074/`

{% hint style="warning" %}
Discord Servers does not support Authentication with webhooks. You will not need to enter the provided passphrase anywhere
{% endhint %}

For the **Content Type** box, please leave it as the default value, `application/json`. Once you have filled out the options as shown below click on the **Submit** button

<figure><img src="https://1720966575-files.gitbook.io/~/files/v0/b/gitbook-x-prod.appspot.com/o/spaces%2FeFEtDi3YGaE1Ne03okdh%2Fuploads%2Fgit-blob-7c8d5bb9415e4c34aa31ea3bab4df29dbe5499e1%2FServer%20Dservers%20%232.png?alt=media" alt=""><figcaption><p>Webhook Name &#x26; Payload URL have been filled out</p></figcaption></figure>

After clicking submit, you should have a table that looks similar to the image below:

<figure><img src="https://1720966575-files.gitbook.io/~/files/v0/b/gitbook-x-prod.appspot.com/o/spaces%2FeFEtDi3YGaE1Ne03okdh%2Fuploads%2Fgit-blob-f26f3d634de1333c6dc54a7f53756d3a675ca631%2FServer%20Dservers%20%233.png?alt=media" alt=""><figcaption><p>The webhook details have been saved</p></figcaption></figure>

Your vote tracker is now fully setup! A message will be sent with your configured embed to the channel you configured whenever a user gives gems to/bumps your server

If you forget or lose your passphrase you can run the `/trackers passphrase` command. Select **Server** for the type then choose the tracker from the options and run the command

<figure><img src="https://1720966575-files.gitbook.io/~/files/v0/b/gitbook-x-prod.appspot.com/o/spaces%2FeFEtDi3YGaE1Ne03okdh%2Fuploads%2Fgit-blob-38ba89b18d4eb57aeaeb27406b26ad9fd78baf47%2Ftracker_passphrase.png?alt=media" alt=""><figcaption><p>Trackers Passphrase Command</p></figcaption></figure>


# Rankly

Learn how to set up your server tracking on Rankly with Vote Manager - A comprehensive guide for server owners

{% hint style="info" %}
This continues from the tutorial on the previous page ([here](/servers/create))
{% endhint %}

To continue your setup, you'll need to navigate to your server's webhook settings on Rankly. The URL should look like this: `https://rankly.live/dashboard/[your-servers-id]/webhooks`

**E.G.** `https://rankly.live/dashboard/959775329843544074/webhooks`

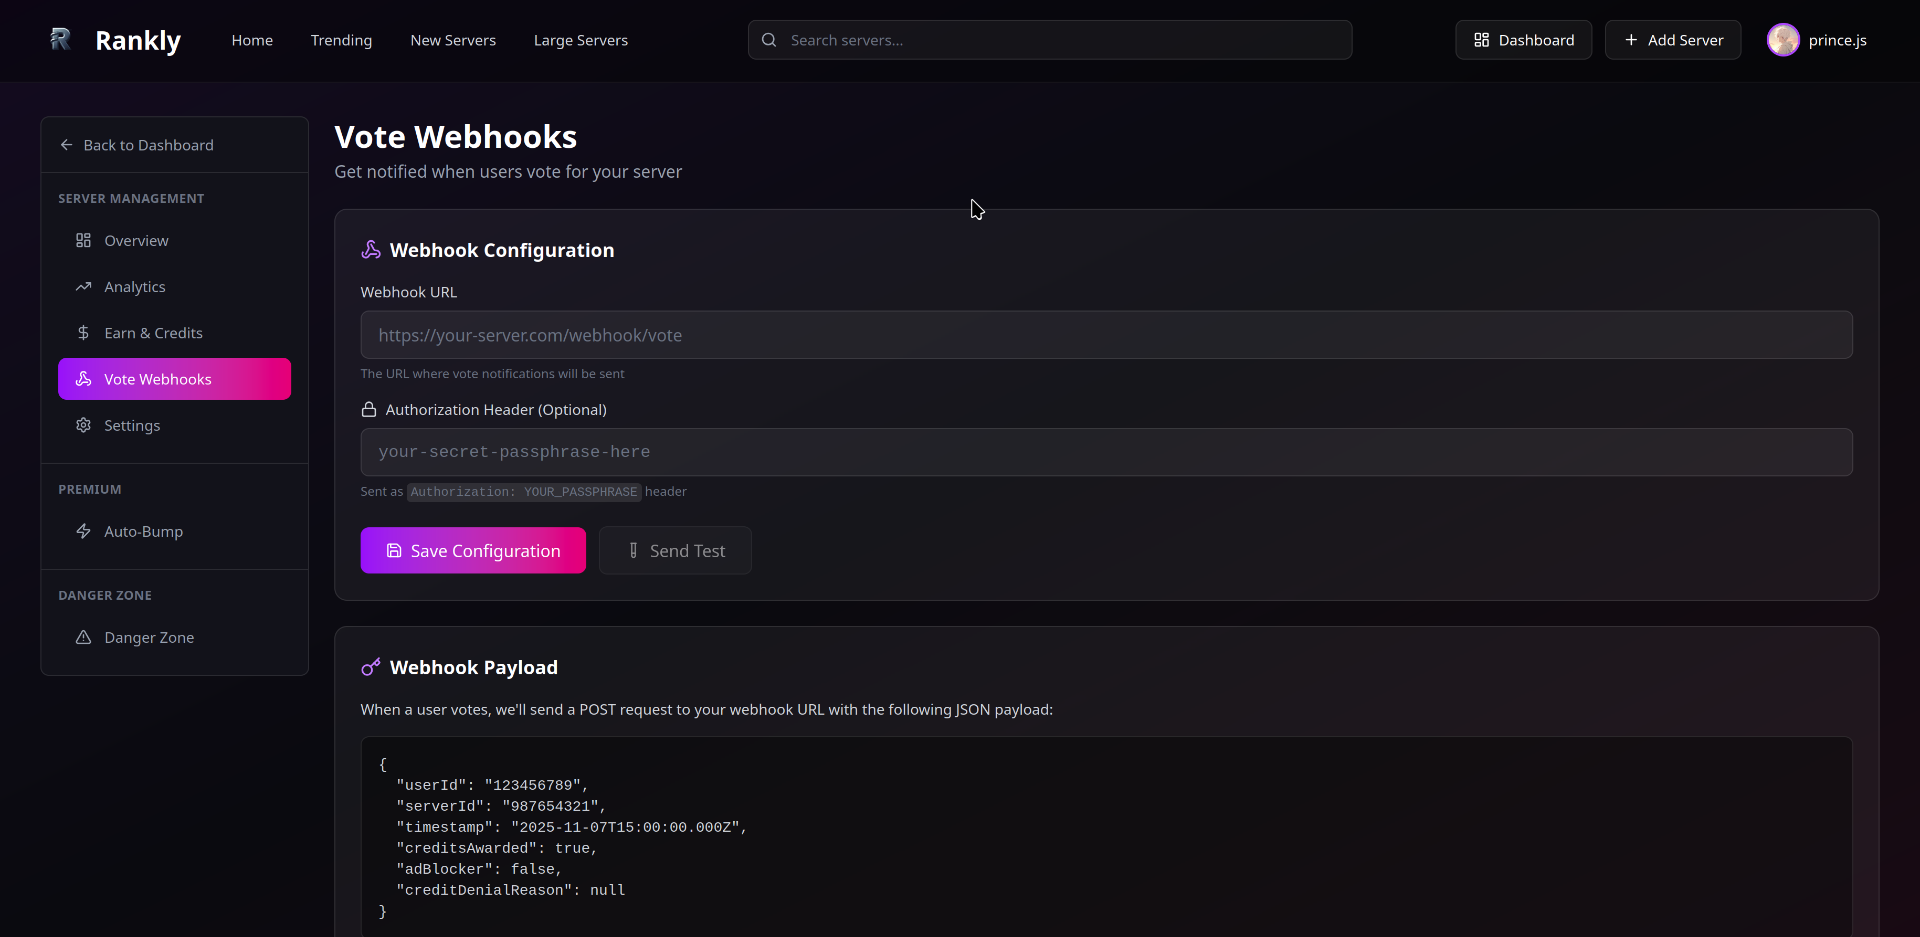
<figure><img src="https://1720966575-files.gitbook.io/~/files/v0/b/gitbook-x-prod.appspot.com/o/spaces%2FeFEtDi3YGaE1Ne03okdh%2Fuploads%2Fgit-blob-ad25f69342f34b03715ad578383d54c79428bf57%2Frankly-1.png?alt=media" alt=""><figcaption><p>Your server's webhook configuration page on Rankly</p></figcaption></figure>

Once you're on the webhooks page, follow these steps:

1. Locate the **Webhook Settings** section on your dashboard
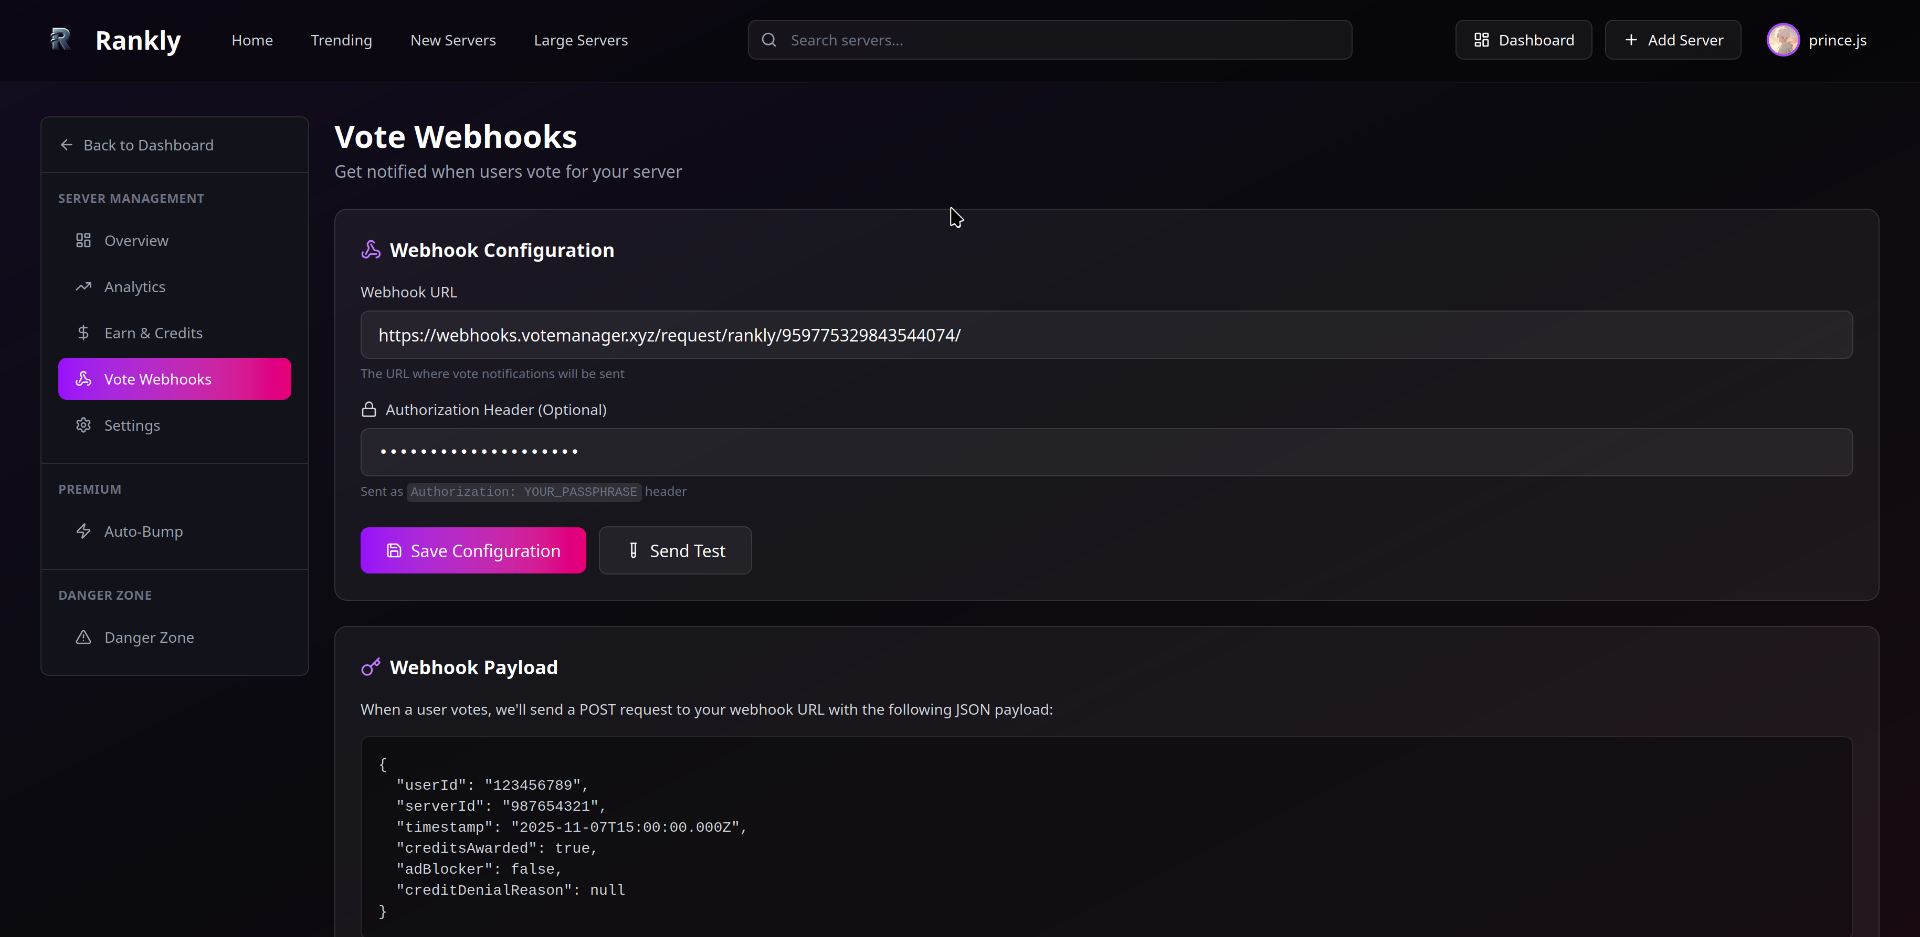
2. In the **Webhook URL** field, paste the URL provided in step two. The URL follows this format: `https://webhooks.votemanager.xyz/request/rankly/[your-servers-id]/`

**E.G.** `https://webhooks.votemanager.xyz/request/rankly/959775329843544074/`

3. Enter the provided passphrase into the **Authorization Header** field

<figure><img src="https://1720966575-files.gitbook.io/~/files/v0/b/gitbook-x-prod.appspot.com/o/spaces%2FeFEtDi3YGaE1Ne03okdh%2Fuploads%2Fgit-blob-109c1b20f0da2fd78bdc740f464a5f7579ba713e%2Frankly-2.png?alt=media" alt=""><figcaption><p>Webhook configuration with filled details</p></figcaption></figure>

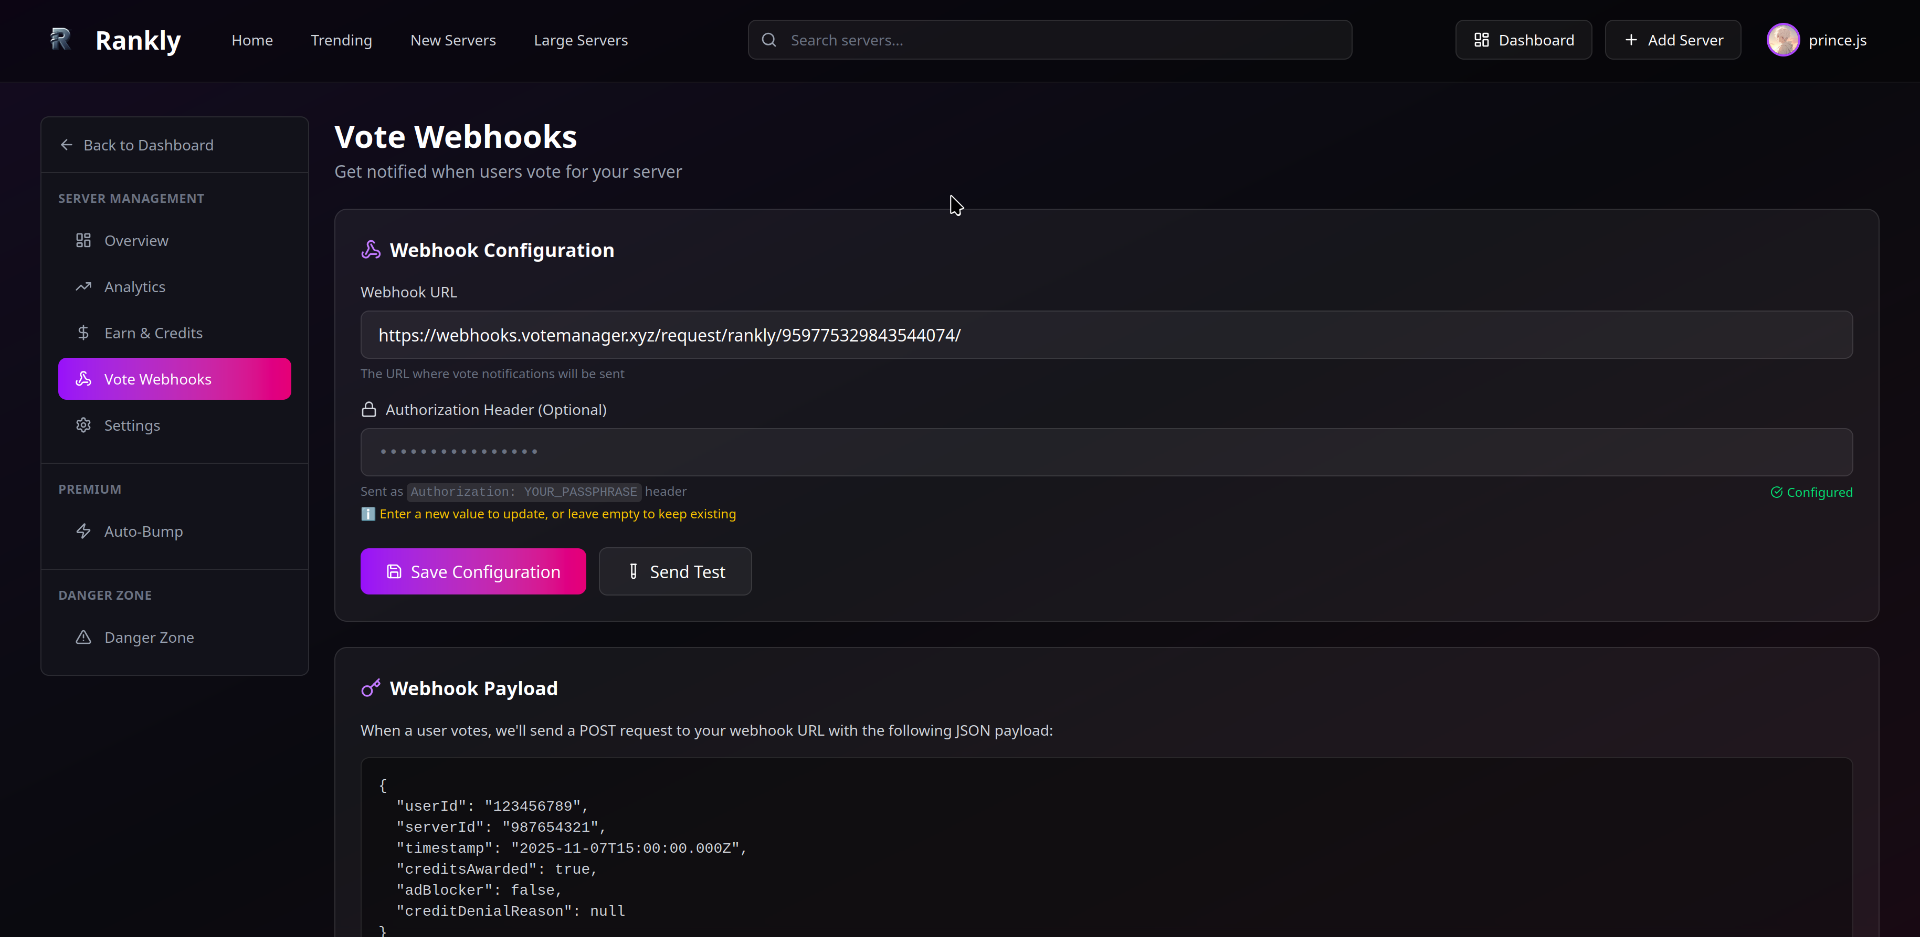
Click the **Save Configuration** button to apply your settings.

<figure><img src="https://1720966575-files.gitbook.io/~/files/v0/b/gitbook-x-prod.appspot.com/o/spaces%2FeFEtDi3YGaE1Ne03okdh%2Fuploads%2Fgit-blob-3124e8ac1fe4f2a6a722f456f8d6ecd680f592f9%2Frankly-3.png?alt=media" alt=""><figcaption><p>Successfully saved webhook configuration</p></figcaption></figure>

{% hint style="success" %}
Congratulations! Your Vote Manager tracking is now set up for Rankly. When users vote for your server on Rankly, notifications will be sent to your configured Discord channel with the customized embed.
{% endhint %}

## Lost Your Passphrase?

If you need to retrieve your passphrase, you can use the `/trackers passphrase` command in Discord:

1. Select **Server** as the type
2. Choose your Rankly tracker from the options
3. Execute the command

<figure><img src="https://1720966575-files.gitbook.io/~/files/v0/b/gitbook-x-prod.appspot.com/o/spaces%2FeFEtDi3YGaE1Ne03okdh%2Fuploads%2Fgit-blob-38ba89b18d4eb57aeaeb27406b26ad9fd78baf47%2Ftracker_passphrase.png?alt=media" alt=""><figcaption><p>Using the Trackers Passphrase Command</p></figcaption></figure>

{% hint style="info" %}
Remember to keep your passphrase secure as it's used to verify webhook requests from Rankly.
{% endhint %}


# Disurl

Find a more detailed description about setting up a server on Disurl with Vote Manager

{% hint style="info" %}
This continues from the tutorial on the previous page ([here](/servers/create))
{% endhint %}

To continue your setup, please go to the link shown as step one. It should look like this: `https://disurl.me/dashboard/server/[your-servers-id]/webhooks`

**E.G.** `https://disurl.me/dashboard/server/959775329843544074/webhooks`

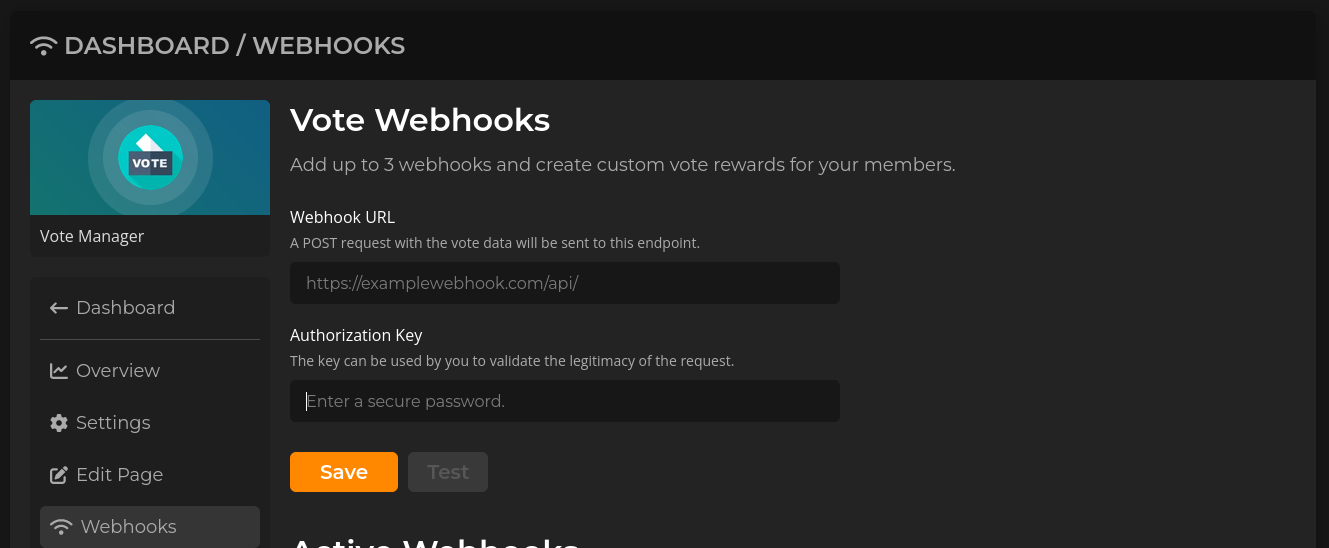
<figure><img src="https://1720966575-files.gitbook.io/~/files/v0/b/gitbook-x-prod.appspot.com/o/spaces%2FeFEtDi3YGaE1Ne03okdh%2Fuploads%2Fgit-blob-ecd535c78dc6e2a7b64cb38e1b5cff34b17d797b%2Fdisurl-1.png?alt=media" alt=""><figcaption><p>Your servers Discord Servers webhooks page</p></figcaption></figure>

You should be taken to a page that looks like the above image.

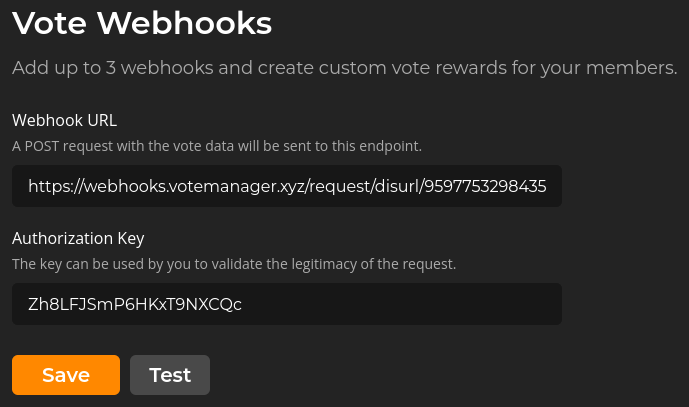
Paste the Webhook URL provided in step two into the field labelled **Webhook URL**. The URL should follow the format `https://webhooks.votemanager.xyz/request/disurl/[your-servers-id]/`

**E.G.** `https://webhooks.votemanager.xyz/request/disurl/959775329843544074/`

Next, enter the provided passphrase into the field labelled **Authorization Key**

<figure><img src="https://1720966575-files.gitbook.io/~/files/v0/b/gitbook-x-prod.appspot.com/o/spaces%2FeFEtDi3YGaE1Ne03okdh%2Fuploads%2Fgit-blob-576238c563dbab9a735da7d265cecb0b00648233%2Fdisurl-2.png?alt=media" alt=""><figcaption><p>Webhook Name &#x26; Payload URL have been filled out</p></figcaption></figure>

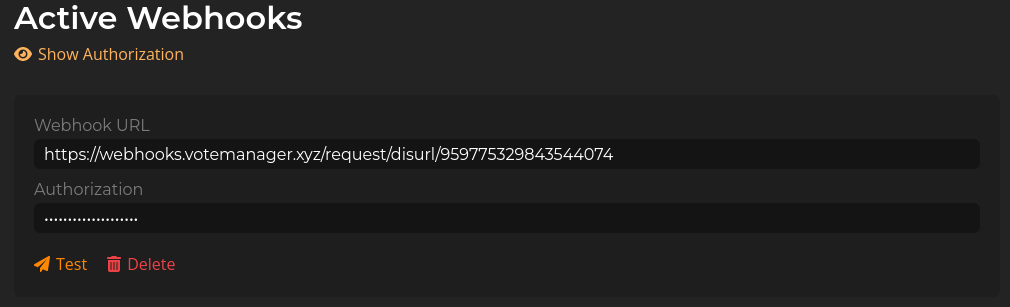
After filling out the fields as described above, click on the **Save** button. You should see an item added in the Active Webhooks section

<figure><img src="https://1720966575-files.gitbook.io/~/files/v0/b/gitbook-x-prod.appspot.com/o/spaces%2FeFEtDi3YGaE1Ne03okdh%2Fuploads%2Fgit-blob-68a155eeb3eec9cbedab268beef06874c58f375b%2Fdisurl-3.png?alt=media" alt=""><figcaption><p>Webhook details have been saved</p></figcaption></figure>

Your vote tracker is now fully setup! A message will be sent with your configured embed to the channel you configured whenever a user gives gems to/bumps your server

If you forget or lose your passphrase you can run the `/trackers passphrase` command. Select **Server** for the type then choose the tracker from the options and run the command

<figure><img src="https://1720966575-files.gitbook.io/~/files/v0/b/gitbook-x-prod.appspot.com/o/spaces%2FeFEtDi3YGaE1Ne03okdh%2Fuploads%2Fgit-blob-38ba89b18d4eb57aeaeb27406b26ad9fd78baf47%2Ftracker_passphrase.png?alt=media" alt=""><figcaption><p>Trackers Passphrase Command</p></figcaption></figure>


# Discord Place

Find a more detailed description about setting up a server on Disurl with Vote Manager

{% hint style="info" %}
This continues from the tutorial on the previous page ([here](/servers/create))
{% endhint %}

To continue your setup, please go to the link shown as step one. It should look like this: `https://disurl.me/dashboard/server/[your-servers-id]/webhooks`

**E.G.** `https://disurl.me/dashboard/server/959775329843544074/webhooks`

<figure><img src="https://1720966575-files.gitbook.io/~/files/v0/b/gitbook-x-prod.appspot.com/o/spaces%2FeFEtDi3YGaE1Ne03okdh%2Fuploads%2Fgit-blob-ecd535c78dc6e2a7b64cb38e1b5cff34b17d797b%2Fdisurl-1.png?alt=media" alt=""><figcaption><p>Your servers Discord Servers webhooks page</p></figcaption></figure>

You should be taken to a page that looks like the above image.

Paste the Webhook URL provided in step two into the field labelled **Webhook URL**. The URL should follow the format `https://webhooks.votemanager.xyz/request/disurl/[your-servers-id]/`

**E.G.** `https://webhooks.votemanager.xyz/request/disurl/959775329843544074/`

Next, enter the provided passphrase into the field labelled **Authorization Key**

<figure><img src="https://1720966575-files.gitbook.io/~/files/v0/b/gitbook-x-prod.appspot.com/o/spaces%2FeFEtDi3YGaE1Ne03okdh%2Fuploads%2Fgit-blob-576238c563dbab9a735da7d265cecb0b00648233%2Fdisurl-2.png?alt=media" alt=""><figcaption><p>Webhook Name &#x26; Payload URL have been filled out</p></figcaption></figure>

After filling out the fields as described above, click on the **Save** button. You should see an item added in the Active Webhooks section

<figure><img src="https://1720966575-files.gitbook.io/~/files/v0/b/gitbook-x-prod.appspot.com/o/spaces%2FeFEtDi3YGaE1Ne03okdh%2Fuploads%2Fgit-blob-68a155eeb3eec9cbedab268beef06874c58f375b%2Fdisurl-3.png?alt=media" alt=""><figcaption><p>Webhook details have been saved</p></figcaption></figure>

Your vote tracker is now fully setup! A message will be sent with your configured embed to the channel you configured whenever a user gives gems to/bumps your server

If you forget or lose your passphrase you can run the `/trackers passphrase` command. Select **Server** for the type then choose the tracker from the options and run the command

<figure><img src="https://1720966575-files.gitbook.io/~/files/v0/b/gitbook-x-prod.appspot.com/o/spaces%2FeFEtDi3YGaE1Ne03okdh%2Fuploads%2Fgit-blob-38ba89b18d4eb57aeaeb27406b26ad9fd78baf47%2Ftracker_passphrase.png?alt=media" alt=""><figcaption><p>Trackers Passphrase Command</p></figcaption></figure>


# Discadia

Find a more detailed description about setting up a server on Disurl with Vote Manager

{% hint style="info" %}
This continues from the tutorial on the previous page ([here](/servers/create))
{% endhint %}

To continue your setup, please go to the link shown as step one. It should look like this: `https://disurl.me/dashboard/server/[your-servers-id]/webhooks`

**E.G.** `https://disurl.me/dashboard/server/959775329843544074/webhooks`

<figure><img src="https://1720966575-files.gitbook.io/~/files/v0/b/gitbook-x-prod.appspot.com/o/spaces%2FeFEtDi3YGaE1Ne03okdh%2Fuploads%2Fgit-blob-ecd535c78dc6e2a7b64cb38e1b5cff34b17d797b%2Fdisurl-1.png?alt=media" alt=""><figcaption><p>Your servers Discord Servers webhooks page</p></figcaption></figure>

You should be taken to a page that looks like the above image.

Paste the Webhook URL provided in step two into the field labelled **Webhook URL**. The URL should follow the format `https://webhooks.votemanager.xyz/request/disurl/[your-servers-id]/`

**E.G.** `https://webhooks.votemanager.xyz/request/disurl/959775329843544074/`

Next, enter the provided passphrase into the field labelled **Authorization Key**

<figure><img src="https://1720966575-files.gitbook.io/~/files/v0/b/gitbook-x-prod.appspot.com/o/spaces%2FeFEtDi3YGaE1Ne03okdh%2Fuploads%2Fgit-blob-576238c563dbab9a735da7d265cecb0b00648233%2Fdisurl-2.png?alt=media" alt=""><figcaption><p>Webhook Name &#x26; Payload URL have been filled out</p></figcaption></figure>

After filling out the fields as described above, click on the **Save** button. You should see an item added in the Active Webhooks section

<figure><img src="https://1720966575-files.gitbook.io/~/files/v0/b/gitbook-x-prod.appspot.com/o/spaces%2FeFEtDi3YGaE1Ne03okdh%2Fuploads%2Fgit-blob-68a155eeb3eec9cbedab268beef06874c58f375b%2Fdisurl-3.png?alt=media" alt=""><figcaption><p>Webhook details have been saved</p></figcaption></figure>

Your vote tracker is now fully setup! A message will be sent with your configured embed to the channel you configured whenever a user gives gems to/bumps your server

If you forget or lose your passphrase you can run the `/trackers passphrase` command. Select **Server** for the type then choose the tracker from the options and run the command

<figure><img src="https://1720966575-files.gitbook.io/~/files/v0/b/gitbook-x-prod.appspot.com/o/spaces%2FeFEtDi3YGaE1Ne03okdh%2Fuploads%2Fgit-blob-38ba89b18d4eb57aeaeb27406b26ad9fd78baf47%2Ftracker_passphrase.png?alt=media" alt=""><figcaption><p>Trackers Passphrase Command</p></figcaption></figure>


# Infinity Bots

Find a more detailed description about setting up a server on Infinity Bot List with Vote Manager

{% hint style="info" %}
This continues from the tutorial on the previous page ([here](/servers/create))
{% endhint %}

{% hint style="warning" %}
At the time of writing, server listing it not yet released on Infinity Bot List, but it currently in public beta
{% endhint %}

To continue your setup, please go to the link shown as step one. It should look like this: `https://infinitybots.gg/server/[your-servers-id]/settings`

**E.G.** `https://infinitybots.gg/server/877814636039266336/settings`

Then, click on **Webhooks** on the sidebar

<figure><img src="https://1720966575-files.gitbook.io/~/files/v0/b/gitbook-x-prod.appspot.com/o/spaces%2FeFEtDi3YGaE1Ne03okdh%2Fuploads%2Fgit-blob-8dd01da806ade7122f23a2b9a437106d41945ec3%2Fibl-1.png?alt=media" alt=""><figcaption><p>Your servers IBL settings page</p></figcaption></figure>

You should be taken to a page that looks like the above image. Click on the **+ New Webhook** button to add a webhook.

<figure><img src="https://1720966575-files.gitbook.io/~/files/v0/b/gitbook-x-prod.appspot.com/o/spaces%2FeFEtDi3YGaE1Ne03okdh%2Fuploads%2Fgit-blob-2f23f9860af5bd8668692e5b8fda6b5c594339db%2Fibl-2.png?alt=media" alt=""><figcaption><p>Your servers webhook settings</p></figcaption></figure>

Then click on the **> Untitled Webhook** button that will appear beneath it. It should expand, showing you options to configure the name, URL & authentication of the webhook

<figure><img src="https://1720966575-files.gitbook.io/~/files/v0/b/gitbook-x-prod.appspot.com/o/spaces%2FeFEtDi3YGaE1Ne03okdh%2Fuploads%2Fgit-blob-a82994fc8d3a6d251d22012ca16cd140c26db9c3%2Fibl-3.png?alt=media" alt=""><figcaption><p>A webhook has been created</p></figcaption></figure>

Name the webhook something that shows what it is, for example, Vote Manager. Then, paste the URL provided in step two into the **Webhook URL** box. The URL should follow the format `https://webhooks.votemanager.xyz/request/ibl/[your-servers-id]/`

**E.G.** `https://webhooks.votemanager.xyz/request/ibl/959775329843544074/`

Enter the provided Passphrase into the **Webhook Secret** field. Ensure that **Simple Auth** is left unchecked and the **Event Whitelist** contains **NEW\_VOTE** or is left empty

<figure><img src="https://1720966575-files.gitbook.io/~/files/v0/b/gitbook-x-prod.appspot.com/o/spaces%2FeFEtDi3YGaE1Ne03okdh%2Fuploads%2Fgit-blob-cc36be10b3029e004286e83ff71484717a0fecb9%2Fibl-4.png?alt=media" alt=""><figcaption><p>Webhook details have been filled out</p></figcaption></figure>

Once you filled out the options described above, click on the **Save Webhooks** button

Your vote tracker is now fully setup! A message will be sent with your configured embed to the channel you configured whenever a user upvotes your server

If you forget or lose your passphrase you can run the `/trackers passphrase` command. Select **Server** for the type then choose the tracker from the options and run the command

<figure><img src="https://1720966575-files.gitbook.io/~/files/v0/b/gitbook-x-prod.appspot.com/o/spaces%2FeFEtDi3YGaE1Ne03okdh%2Fuploads%2Fgit-blob-38ba89b18d4eb57aeaeb27406b26ad9fd78baf47%2Ftracker_passphrase.png?alt=media" alt=""><figcaption><p>Trackers Passphrase Command</p></figcaption></figure>


# Editing

Made a slight typo in your vote embed? Need to change the vote message channel? You can edit your setup using the steps below

{% hint style="info" %}
This requires you to already have an existing setup for the server you are running the command in, on the platform you want to edit
{% endhint %}

To edit a vote tracker, simply run the `/trackers edit` command and fill in the required options.

<figure><img src="https://1720966575-files.gitbook.io/~/files/v0/b/gitbook-x-prod.appspot.com/o/spaces%2FeFEtDi3YGaE1Ne03okdh%2Fuploads%2Fgit-blob-c35eeb497df30761c7059182a6ee9d69f28830ce%2Ftracker_edit.png?alt=media" alt=""><figcaption><p>Trackers Edit Command</p></figcaption></figure>

Use the optional `channel`, `role` & `duration` parameters to change the respective settings for the vote tracker. Any options left blank will retain their previous value

{% tabs %}
{% tab title="Required Options" %}

* `type` - The type of tracker (select **Server**)
* `tracker` - The tracker you wish to edit
  {% endtab %}

{% tab title="Optional Options" %}

* `channel` - Channel to send your vote message in
* `role` - Role to be given to users after they vote
* `duration` - How long user should keep the role specified above
  {% endtab %}
  {% endtabs %}

<figure><img src="https://1720966575-files.gitbook.io/~/files/v0/b/gitbook-x-prod.appspot.com/o/spaces%2FeFEtDi3YGaE1Ne03okdh%2Fuploads%2Fgit-blob-e8a8e640bcce11ecc04cece9866d96033ad5d5da%2Ftrackers_edit_server.png?alt=media" alt=""><figcaption><p>Options have been filled out</p></figcaption></figure>

{% hint style="info" %}
Other rewards can be managed via the `/rewards` command (more details [here](https://github.com/vote-manager/docs/blob/main/servers/broken-reference/README.md))
{% endhint %}

Once you have run the `/trackers edit` command, the vote message embed will appear, allowing your vote embed to be updated. If you wish to leave your vote embed the same, simply press <mark style="color:purple;">**Submit**</mark>

<figure><img src="https://1720966575-files.gitbook.io/~/files/v0/b/gitbook-x-prod.appspot.com/o/spaces%2FeFEtDi3YGaE1Ne03okdh%2Fuploads%2Fgit-blob-5c7e358862abfb84232aba2cc138bbab2126c11d%2FServer%20Create%20%233.png?alt=media" alt=""><figcaption><p>Vote Message Embed Builder</p></figcaption></figure>

{% hint style="info" %}
You can use variables to have vote information in your vote message. see [here](/variables) for more details
{% endhint %}

{% tabs %}
{% tab title="Required Fields" %}

* **Title** - title of the embed
  * <mark style="color:green;">**✓**</mark> <mark style="color:green;">- Variables are supported</mark>
  * <mark style="color:green;">**✓**</mark> <mark style="color:green;">- Markdown is supported</mark>
* **Color** - color of the left border on the embed
  * <mark style="color:green;">**✓**</mark> <mark style="color:green;">- Variables are supported</mark>
  * <mark style="color:red;">**✗**</mark> <mark style="color:red;">- Markdown is not supported</mark>
  * <mark style="color:green;">**✓**</mark> <mark style="color:green;">- Allowed formats</mark>
    * Hex code (Ex `#0bbbb7`)
    * Integer (Ex `0x0bbbb7`)
    * RGB color values (Ex `11, 187, 183`)
    * Preset (Ex `Red`)
* **Description** - main content of the embed
  * <mark style="color:green;">**✓**</mark> <mark style="color:green;">- Variables are supported</mark>
  * <mark style="color:green;">**✓**</mark> <mark style="color:green;">- Markdown is supported</mark>
* **Footer** - small text at the bottom of the embed
  * <mark style="color:green;">**✓**</mark> <mark style="color:green;">- Variables are supported</mark>
  * <mark style="color:red;">**✗**</mark> <mark style="color:red;">- Markdown is not supported</mark>
    {% endtab %}

{% tab title="Optional Fields" %}

* **Image** - Big image in the embed. Appears below the description
  * <mark style="color:green;">**✓**</mark> <mark style="color:green;">- Variables are supported</mark>
  * <mark style="color:red;">**✗**</mark> <mark style="color:red;">- Markdown is not supported</mark>
  * <mark style="color:green;">**✓**</mark> <mark style="color:green;">- Allowed formats</mark>
    * Any `https`or `http` link to an image file
      {% endtab %}
      {% endtabs %}


# Deleting

We don't like to see you go but, if you do you might want to delete your vote tracker. The steps below will help you to do so

{% hint style="danger" %}
Deletion of your setup generally can't be undone and is final. See below for a list of things deleted when you delete your setup
{% endhint %}

Should you need to delete a vote tracker at any point, you can use the `/trackers delete` command. Simply fill in the required options and run the command

<figure><img src="https://1720966575-files.gitbook.io/~/files/v0/b/gitbook-x-prod.appspot.com/o/spaces%2FeFEtDi3YGaE1Ne03okdh%2Fuploads%2Fgit-blob-a85d2c3bac0f8f65ed7c5dad34d8af8a3adb5b31%2Ftracker_delete.png?alt=media" alt=""><figcaption><p>Trackers Delete command</p></figcaption></figure>

{% tabs %}
{% tab title="Required Options" %}

* `type` - The type of tracker (select **Server**)
* `tracker` - The tracker you wish to edit
  {% endtab %}
  {% endtabs %}

<figure><img src="https://1720966575-files.gitbook.io/~/files/v0/b/gitbook-x-prod.appspot.com/o/spaces%2FeFEtDi3YGaE1Ne03okdh%2Fuploads%2Fgit-blob-f5075f46218d4ba67f9bafbda7b41a0b7527db6e%2Ftrackers_delete_server.png?alt=media" alt=""><figcaption><p>Options have been filled out</p></figcaption></figure>

Once you run the command, the setup for the provided bot on the provided platform will be deleted along with all cached votes. Please see below for more details on what gets deleted by the `/trackers delete` command and what to do if you accidentally delete your setup

**Please note that there is currently no conformation for setup deletion!**

{% hint style="warning" %}
We recommend also removing the webhook URL & Authentication from your bots page of the platform provided
{% endhint %}

#### Setup Deletion Includes

* Loss of vote tracking functionality on for the provided bot on the provided platform
* Loss of embed customisation, you will have to provide this information again if you chose to set up your bot with Vote Manager again
* Loss of all cached vote counts (for the vote leaderboard)

#### Setup Deletion Doesn't Include

* Change or loss of your bots actual vote count of the provided platform
* Deletion of tracker on other platforms for your bot

#### Accidental Setup Deletion

If you got a bit too excited running commands, or you just selected the wrong option and your setup got deleted by mistake, you can contact us either by [email](mailto:contact@votemanager.xyz) or in our [discord server](https://votemanager.xyz/discord). If you can provide proof of ownership or an admin position and a recent vote leaderboard, we can try to restore your bots cached vote counts and leaderboard. **We can't guarantee that we will be able to restore your data**


# Adding

Want to add more role rewards for voters? Say for 20, 30 or 50 votes? You can do that! The steps shown here will teach you how

To add a new role reward, run the `/rewards add` command

<figure><img src="https://1720966575-files.gitbook.io/~/files/v0/b/gitbook-x-prod.appspot.com/o/spaces%2FeFEtDi3YGaE1Ne03okdh%2Fuploads%2Fgit-blob-83f36a0cd3bbed789a6c0995e16b297592f50885%2Frewards_add_1.png?alt=media" alt=""><figcaption><p>Rewards Add Command</p></figcaption></figure>

{% tabs %}
{% tab title="Required Options" %}

* `type` - The type of tracker (**Bot**/**Server**)
* `tracker` - The tracker you wish to add a reward for
* `type` - The type of votes to check
* `votes` - How many votes the user needs to be given the role
* `role` - The role the user should be given
  {% endtab %}

{% tab title="Optional Options" %}

* `duration` - Set the duration the user should keep the role for
  {% endtab %}
  {% endtabs %}

<figure><img src="https://1720966575-files.gitbook.io/~/files/v0/b/gitbook-x-prod.appspot.com/o/spaces%2FeFEtDi3YGaE1Ne03okdh%2Fuploads%2Fgit-blob-cd6c4b6e760638e52a72a12ae7bd3af00efb78c1%2Frewards_add_2.png?alt=media" alt=""><figcaption><p>Options have been filled out</p></figcaption></figure>

Once you have filled out all the options, you can run the command and the role reward will be saved

The role will now be given to any users to votes the provided number of times on the provided platform for the bot/server

{% hint style="info" %}
The role is only given when a user reaches the number of votes. It will not be given to users who already have enough votes until they vote again
{% endhint %}


# Removing

Set the wrong number of votes for a role reward? Added to many role rewards? Don't worry, you can remove a role reward by following the steps shown here

## Removing a single reward

To remove a single role reward, run the `/rewards remove` command

<figure><img src="https://1720966575-files.gitbook.io/~/files/v0/b/gitbook-x-prod.appspot.com/o/spaces%2FeFEtDi3YGaE1Ne03okdh%2Fuploads%2Fgit-blob-01907c2b348fdcab579b00e4ad3e7ba274689271%2Frewards_remove_1.png?alt=media" alt=""><figcaption><p>Rewards Remove Command</p></figcaption></figure>

{% tabs %}
{% tab title="Required Options" %}

* `type` - The type of tracker (**Bot**/**Server**)
* `tracker` - The tracker you wish to remove a reward from
* `role` - The reward that should be deleted
  {% endtab %}
  {% endtabs %}

<figure><img src="https://1720966575-files.gitbook.io/~/files/v0/b/gitbook-x-prod.appspot.com/o/spaces%2FeFEtDi3YGaE1Ne03okdh%2Fuploads%2Fgit-blob-c6eb832641616d1e46ec00298c7a1faf3c7aba22%2Frewards_remove_2.png?alt=media" alt=""><figcaption><p>Options have been filled out</p></figcaption></figure>

Once you have filled out all the options, you can run the command. The role reward will now not be given any more.

{% hint style="warning" %}
This does not remove the role from members, nor does it delete the role
{% endhint %}

## Removing All Rewards

Should you wish to remove all extra role rewards, you can use the `/rewards reset` command

<figure><img src="https://1720966575-files.gitbook.io/~/files/v0/b/gitbook-x-prod.appspot.com/o/spaces%2FeFEtDi3YGaE1Ne03okdh%2Fuploads%2Fgit-blob-225cc3cfd1c3a4cfd9fb7619480f9e229e47f235%2Frewards_reset_1.png?alt=media" alt=""><figcaption><p>Rewards Reset Command</p></figcaption></figure>

{% tabs %}
{% tab title="Required Options" %}

* `type` - The type of tracker (**Bot**/**Server**)
* `tracker` - The tracker you wish to remove a reward from
  {% endtab %}
  {% endtabs %}

<figure><img src="https://1720966575-files.gitbook.io/~/files/v0/b/gitbook-x-prod.appspot.com/o/spaces%2FeFEtDi3YGaE1Ne03okdh%2Fuploads%2Fgit-blob-b3f3dbb95d98651f8f1a9598444024e1bd7733e9%2Frewards_reset_2.png?alt=media" alt=""><figcaption><p>Options have been filled out</p></figcaption></figure>

Once you have filled out all the options you can run the command and all extra vote rewards will be removed

{% hint style="warning" %}
This does not remove any of the roles from members, nor does it delete any of the roles
{% endhint %}


# Via Dashboard

Want to manage extra role rewards via our new Web Dashboard? Below, you learn how to add & remove role rewards in the dashboard

To get started, go to the rewards page of your servers dashboard & select the platform you wish to add or remove role rewards for. If you are managing roles for a bot, select the bot from the dropdown in the top left

<figure><img src="https://1720966575-files.gitbook.io/~/files/v0/b/gitbook-x-prod.appspot.com/o/spaces%2FeFEtDi3YGaE1Ne03okdh%2Fuploads%2Fgit-blob-15b3e3d0956d5dfdb4ffa4c815062bcff01bde65%2FRewards%20Dash%20%231.png?alt=media" alt=""><figcaption><p>Rewards page of your servers dashboard</p></figcaption></figure>

To add a role reward, simply fill out the options under the heading **Add Reward**. To make the role permanent, leave the **Duration** inputs blank

<figure><img src="https://1720966575-files.gitbook.io/~/files/v0/b/gitbook-x-prod.appspot.com/o/spaces%2FeFEtDi3YGaE1Ne03okdh%2Fuploads%2Fgit-blob-32cfe1003abcb85c5dfb5523251c7634daa36040%2FRewards%20Dash%20%232.png?alt=media" alt=""><figcaption></figcaption></figure>

<figure><img src="https://1720966575-files.gitbook.io/~/files/v0/b/gitbook-x-prod.appspot.com/o/spaces%2FeFEtDi3YGaE1Ne03okdh%2Fuploads%2Fgit-blob-5ffe70a4d0afb6e87283c1dda0d6b2bdee6a7628%2FRewards%20Dash%20%233.png?alt=media" alt=""><figcaption></figcaption></figure>

Once you have finished filling out the options, click on the **Add Reward** button in the bottom right. The role will be added to the **Current Rewards** table. You can now add more roles. Remember to save once you're done!

<figure><img src="https://1720966575-files.gitbook.io/~/files/v0/b/gitbook-x-prod.appspot.com/o/spaces%2FeFEtDi3YGaE1Ne03okdh%2Fuploads%2Fgit-blob-a7edcc3f497cf2a0f640f34b2919f19ba17aa1b5%2FRewards%20Dash%20%234.png?alt=media" alt=""><figcaption></figcaption></figure>

If you wish to remove a role, then just click on the **X** icon next to the row containing the role reward you wish to remove. It will then be removed from the able and once you press **Save Changes** that role will no longer be given


# Buckets

jkkkjklj;oh;ouh;


# Leaderboard


# Reseting Votes